|
Death’s Cold Embrace - Act 1: Prologue Scene 1: Murder
Most Foul After
14+ years in the making, the long awaited campaign by Yandros
& Co. was finally here. Needless to say, it interrupted everything else
Thief related, including my reghosting of Thief
Gold. I was at least going to play a few missions, to get into the story.
Though I suspected I wasn’t going to be able to limit it to only a few. The
first mission is absolutely top notch. Classic thieving, but with a solid,
yet unique story as a foundation. What more could one ask? The
story was cleverly set between the events of The Dark Project and The Metal
Age, during the steep rise of Karras. I had
accepted a job from Lord Richard Fairbanks to break into a basement workshop
to retrieve information on a formula for the production of synthetic
emeralds. Apparently, Fairbanks was in a feud with the competing family head
Alan Highwater, whose like interest in said formula
complicated matters. I was to meet Fairbanks at the Trickster’s Tail Inn when
returning from the workshop. 7,000 in loot was also needed, besides ending by
the South Gate. It
was rare to start with nothing but a sword, blackjack, compass and compass.
Plenty of equipment was available at the purchase screen, but that would bust
Supreme up front; not a desirable outcome. I would need at least one rope
arrow. Possibly a water arrow as well. I took my chances and got going.
Establishments Climbed
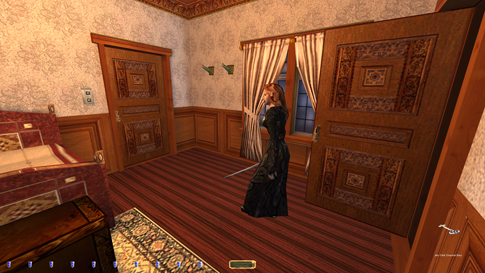
the roofs early and entered Linda’s Luxury Apparel. I knew the main entrance
was locked and unpickable, so I used the attic
shutters instead. Got my obligatory rope arrow there (left image above).
Descended into the bedroom and started looting. Well over one thousand worth
was found in this establishment alone. Linda herself had at least four patrol
end points. Only one of those was upstairs, so she mostly kept to the floor
below. Never took her key, as it only worked on the front door. I don’t like
picking up unneeded stuff, plus the Supreme Ghost mode discourages it. Found
another secret by flipping a switch in one of the staircase bookshelves
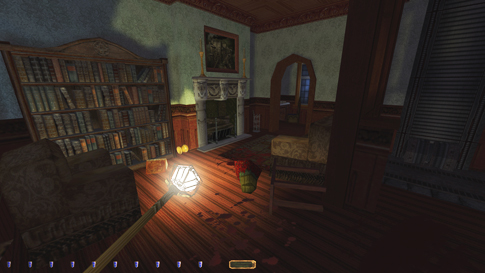
(right image above). I exited back onto the adjacent roof. Jumped
across to Harlequin Inn and looted one of the bedrooms there. Descending to
the restaurant spawned a comment from the bartender (left image below). This
is a bust to Supreme and unavoidable. The front door was open, but the
candles were too bright to avoid the comment there also. I couldn’t even
avoid a regular Ghost bust without removing at least one light source. The
purse was thus skipped for Supreme. Sad, but true.
Cleaned
the electric station to the east next. Only one patroller, an archer
upstairs. He alternated between the bedroom and the outside balcony. You need
at least two full cycles if you want to get all the goodies in there. The
lock on one of the footlockers was rather lengthy. Some interesting readables around the city so far. They give much
information on rather trivial, but realistic matters. The sound stopped once
I reached the secret attic space. I had to monitor the archer from above in
order to descend safely (right image above). Found three pieces of loot in
windowsills in the near vicinity. One of them had to be taken from a
neighboring lamppost. Dropped back to street level afterwards. Cleaned
the bakery with no issues. I actually felt bad stealing anything after
reading his diary. Hopefully he makes it to his mum in the spring. Redleaf Square had some bright portions, but patrollers
were few and far between. Picking the door to the artist studio wasn’t too
troublesome. There was nobody in there, so I could loot in peace. Found a
small ring next to the couch by the elevator (left image below). Had to skip
the candlestick in the bedroom upstairs for Supreme. It’s one of those that
has to be snuffed to be taken. Though in recent years I’ve started to go back
on my opinion of counting these as busts at all. It seems more silly than
realistic. The rule was obviously created in order to avoid removing light
sources for easier sneaking past guards or through exposed territory.
Naturally, that wasn’t the case here. I definitely encourage a discussion on
the topic.
Got
the key to the basement next. Fun to see both antagonists from the original
games in the same room, canvas notwithstanding (right image above). Got the
loot down there, including the small coin under the stairs. Remembered to
return the metal key to the mantelpiece also. Jewelry! Found
another piece of windowsill loot outside; a ring above the jewelry store
(left image below). Went for this establishment next. Had to listen for the
guard inside when picking the main entry door. He commented if coming too
close. Lots of valuables once inside, but not much was accessible at this
point. Found the secret under the counter and the key behind the statue. The
guard came down at this point. I followed him upstairs and analyzed his
patrol. He stopped in two spots, by the fireplace and the bookshelf. Both
times with his back turned, which gave me the chance to act. However, without
turning off lights I was still quite limited. I couldn’t find a single spot
of shade in the entire room. I could safely wait to the guard’s right when he
was stationed by the bookshelf (right image below). He turned and headed down
the stairs without further comments. I grabbed the loot and found the hidden
attic entrance by frobbing one of the books.
The
now open ceiling hatch concealed what I assume to be the jeweler himself. His
bedroom was simple in design, but with absolutely no shade. He had a locked
safe on one side of the bed and a nightstand with a key on the other. A big,
fat alarm button was located directly above said nightstand. The jeweler had
an odd patrol route, if that’s what you’d call it. I’ll try to explain. He
walks from the foot of the bed over to the cabinet in the northwest corner,
just to the left of the access hatch. He eventually does a scripted search
maneuver, walks back and stations himself by the foot of the bed again,
facing south. After a little while, he turns around, facing north. Then he
might resume the patrol to the cabinet directly from this position, or he
could turn around south again. If he turns, then he will always head to the
cabinet next, and that completes the loop. While stationed by the bed, he
will always turn towards the east. This was very good as it meant I could
position myself on his west side and stay undetected. I could however not
stay there when he started walking back to the cabinet; then he’d catch me
every time. He ran for the alarm button immediately, then drew a dagger and
started whacking me. Very unpleasant, to say the least. This meant I had to
do what I could, then leave down the hatch before he resumed his mini-patrol.
Easier said than done. The key from the bottom floor unlocked the safe in
here, so optimally I’d want to clear the contents of the safe and take the
key on the nightstand before leaving. The best time to arrive from below was
when he was heading back from the cabinet towards the bed. If this happened
right as the guard walked down the stairs, the timing was perfect. I could
unlock the safe as the jeweler faced south, steal the valuables and the key
when he faced north, then hope he turned back south so I could leave down the
hatch. If I was quick enough, the swordsman was now on his way up the stairs.
If so, I could mantle the partition above the desk and silently drop down
behind the guard before he emerged around the corner. No need to worry about
closing the ceiling hatch, as I’d have to return the heavy key anyway.
Took
all the loot below, valued at well over 1,000. Then came the job of returning
the key. Amazingly, the jeweler didn’t hear the sound of the key dropping.
Occasionally he alerted, but more often than not he didn’t even give a
comment. I could use the same method as before, timing the guard below. The
screen capture above and to the left shows the key returned, the jeweler calm
and the loot from downstairs taken. Afterwards I had to refrob
the book to close the hatch on my way down. Ornate Keys Listened
to a conversation by the gate to Farpoint Alley,
then proceeded east past The Trickster’s Tail. No need to go there yet. Dayport Lighting and one of the apartments in the eastern
section were connected by a banner beam on Maple Road. If I could find a way
to get up there from the streets, then I wouldn’t have to pick the lock to
either establishment. As you maybe know, I don’t like picking doors that can’t
be relocked. Not that it’s a bust, but I feel it goes against the spirit of
the Supreme rules, if it can be avoided. The sloped corner roof directly to
the east served as the perfect attachment point (right image above). Snowy
roofs always work well for rope arrows. I had to pick up the rope (since I
only carried one) and reuse it on the topmost part. This was tough as I had
to shoot it while sliding backwards. It worked eventually, but took some
practice. From here I could enter either of the aforementioned buildings via
windows. I chose the residential apartment for now.
Clara,
the fencing master, protected her house well. She patrolled through every
room bar the bathroom. Nowhere else was dark either, besides her study,
though she turned on the light when entering. I waited in the bathroom
doorway until she left to head downstairs, snagging her key along the way
(left image above). I knew I would need it for an upcoming objective. I
cleaned her office, then followed her down below. She was stationed long
enough by the window for me to grab the three remaining pieces of loot (right
image above), but there was nowhere to hide and avoid a first alert down
there. I had to be swift and quickly withdrew to the stairs. Dropped
back to the street, again by use of a rope into the small corner roof.
Otherwise I’d take damage in the fall. Moved slightly south to the east side
of Fairbanks Manor. That estate wasn’t accessible, at least not in this
mission. However, there was an open window to apartment #2 directly to the
east, through a backyard gate. It led to Boris Davidov’s
retreat, with his body scattered on the floor. The door to the office was
open, and one of the thieves mentioned in a readable at Clara’s was stationed
outside. He pivoted north, west and south, with random intervals. I could
mantle the window without alerts, and even get onto the floor with no busts,
but only if I inched ever so slightly (left image below). I was bright red,
so even the smallest of speed enhancements triggered a comment. To get out of
this room, the thief had to be facing north long enough for me to
creep-crouch down the hall and around the corner by the fireplace. From here
I could gather the remaining pieces of loot while the thief kept his back
turned.
The
patrolling thief also covered the dining hall as part of his route, but
seemed to spend most of his time upstairs. The stairs and both hallways were
pitch black, a relieving changeup from the buildings so far. The thief made
scripted search movements throughout his route, as if looking for something.
I had a hunch of what for. Found his sought after key behind a flower pot in
the locked office (right image above). Looted the rest of the place without
trouble. Leaving through the office window was easier than getting in.
Mantling isn’t registered as a speed enhancement and doesn’t affect the light
gem. As long as the thief faced north, I was good. Headed For Miller’s Moved
south along Maple Road, turning east by the high priest’s residence. The hammerite chapel wasn’t accessible, but there was a piece
of loot up there I wanted (left image below). The outside guard didn’t alert
unless I attacked, but he did give settling remarks as if he had alerted.
This is a common bug when it comes to neutral guards. Such remarks are not
considered Supreme busts, but I always try to avoid them if I can. I climbed
the fence to the guard’s left and mantled the statue behind him. Going back
down I had to drop onto the statue’s side to avoid any noise, then furthermore
onto the snowy steps by the front door.
The
guard station further north was no issue. Only the safe with the key and loot
to worry about. One swordsman patrolled all the way to north gate, while the
female archer stationed herself on the upper balcony for a bit. Plenty of
time for me to do my deed. Cleaned Greenwood Apartments also without real
trouble. Dodging the lantern guy wasn’t much of an issue as the entire flat
was dark. Using the ornate keys on the chest revealed the keystone and
triggered a hidden objective. Hid in the southwest corner for the bum to pass
on my way out (right image above). Closing
in on Miller’s apartment now. The stationary swordsman outside pivoted west
and east. I could move in on his right side when he had his back turned (left
image below). Luckily, he always swung south for me to inch by either
direction. Unlocking the door didn’t cause any alerts, but closing it back up
did. Instead I blocked it and left it ajar for now. At least then the bust
could be postponed for a bit. Bittersweet, I guess. The apartment itself was
a watering mouthful of spine-chilling atmosphere and creepy ambiance (right
image below). None of the evidence had been cleaned up yet, and I could hear
Delilah’s metallic squeals in the distance. Not to mention her clunking
footsteps. Rarely have I felt a better buildup of tension towards a reveal.
First overhearing the guards, then reading the diaries, now seeing the scene
and hearing the perpetrator, knowing I had to face whatever was down there.
Absolutely terrifying, in the best possible way.
Cleaned
the loot on both floors and activated the elevator. Down to the basement I
went. Delilah spent most of her time in the dining hall, “tending” to Miller
(left image below). She walked around the table, switching off the light on
her way out. She then crossed the basement floor to the safe room and headed
back to Miller again. All in, all she was easy to dodge once I knew her
route. Got his key and the loot when she was out. There was a furnace room
also, but I didn’t find anything worthwhile in there. The real problem came
with the golden child in the safe room. It seemed to be rendered inactive due
to some electrical inhibitor in the floor. As soon as I unlocked the safe
though, the green charge disappeared and it went active, spotting me
immediately. I was never able to leave the room without it chasing me even. I
could short circuit it before opening the safe with a water arrow to the
wiring between the barrels. This didn’t show up as damage or a kill in the stats,
but still goes against Ghost rule #2. After the safe was open, it couldn’t be
killed like this any longer. Apparently the safe staying locked maintained
the electrical charge that kept the robot at bay. The lamp above the safe was
really the problem. It flickered intensely, going dark only for a fraction of
a second. To keep Supreme intact I’d have to unlock the safe, get the notes,
close the safe and get out of the room without any alerts. That scenario just
wasn’t feasible. Fortunately, the lamp could be doused for about 10 seconds
with a water arrow, leaving at least regular Ghost unbroken (right image
below). A Supreme bust, but what can you do? Miller’s key disappeared upon
use.
Returned
the elevator to the first floor and reset the switch. Got an inevitable first
alert from the outside guard when leaving. The mission’s second Supreme bust.
Returned the key to the guard station safe next. No issues. The key could be
returned silently on top of the letter. The only place left to visit before
meeting Fairbanks was Dayport Lighting. Entered by
climbing the beam like I had done earlier. No individuals in there, so I cleared
it without difficulties. There was a hidden key for the safe in the upstairs
bookcase (left image below). Used the vent shaft to travel to the Trickster’s
Tail and delivered Miller’s notes. Got more information on my next assignment.
Took the last three pieces of loot in this building before ending by the
South Gate. I can’t tell you how excited I am for the upcoming nine
missions!!
Statistics: Time: 1:44:55 Loot: 9425 out of 9425 (Supreme: 9235) Pickpockets: 2 out of 2 Secrets: 5 out of 5 Locks Picked: 11 Damage Dealt: 0 Damage Taken: 0 Consumables: 1 Water Arrow Ghost: Success! Perfect Thief: Success! Supreme Thief: Failed! Perfect Supreme Thief: Failed! Notes: -
Skipped a purse (140) at the Harlequin Inn for Supreme.
The back door spawned a comment from the bartender, and the front door area
was too bright. -
Skipped a candlestick worth 50 upstairs at the artist’s
for Supreme. Removing light sources is not allowed for that mode. -
Used one water arrow to temporarily put out the lamp
above the safe in Miller’s basement. Supreme violation. -
Got a first alert when leaving Miller’s apartment. The
outside guard heard the door closing. Another Supreme bust. |
|
|