|
KEEPER OF THE PROPHECIES - Mission 4: Oracle of the Prophets The
strangest mission in the campaign by far, and also among the oddest creations
for Thief period. Although it definitely isn’t everyone’s cup of tea, it
emits a sense of dread and isolation above most other missions I’ve played.
Honestly, it depicts space beyond time in a very interesting, almost
nightmarish manner. It links together the first trilogy with the missions to
follow in an effective yet frightening way. A truly underrated gem this, in
my opinion. The
only thing I had to do was find an antidote for my poisoned condition, while
I had no information on how to accomplish that. I also couldn’t kill any of
the lost hammerites, though I’m not sure how exactly one can do this, as all
the hammerites I encountered were already dead. An additional optional objective
triggered from a readable close to the starting location. This objective
cannot be completed though, as it gets canceled later on and replaced by a
required one. I don’t think I’ve ever seen a hidden, optional, unachievable
objective before. Strange stuff, but it went with the territory I guess. Luckily,
I never needed to interact with the monsters atop the asteroid. They were
already in severe hunt mode from hearing the initial guy getting blown to
pieces. If you manage to catch a viewing of it, get ready to be amused.
Arcelious’ journal wasn’t strictly speaking necessary, but I was able to get
it while hiding behind hardcover. The outer edge of the asteroid had four
different colored orbs that teleported me to different cave systems. It
doesn’t matter what order you do them in, but story wise the red one makes
sense to do first.
Red/Green Caves Each
cave system had loot on the top floor which was devoid of enemies, then a
middle floor with patrollers, and a bottom floor with an orb I had to frob.
The latter is what makes the mission a Supreme failure, as unavoidable traps
start firing once the orb gets frobbed. Luckily, no enemy hears the impacts
of the traps. The only way they would get alerted was if they saw me or got
hit by the traps and furthermore alerted nearby enemies. In most of the caves
I could simply wait for all the enemies to wander off to nearby caves and
then frob the orb. A small orb had to be clicked first, in order to extend a
magical bridge on which to travel. This was timed and the bridge went back
after not too long. Most of the orb caves were dark along the side walls, but
on top of the lava pool I was brightly lit. The red cave was a bit special,
as there was a big charaka monster (I take that name from The Black Frog
campaign) in the southeast corner guarding a particle wall (left image
above). Conveniently, it was directly behind a pillar, which made me able to
angle my run and not get spotted. Another
issue in the red cave was Kelvin’s body and journal hidden behind the
aforementioned monster (right image above). Reading the journal canceled the
optional tablet objective, but there was no way of getting past the guardian
without at least a first alert. Instead, I had to use an alternate tunnel on
the floor above and descend through a hole to the east (left image below). I
could get back up with a rope arrow, which means for Supreme (if you want to
complete this objective) you have to pick up the rope arrows at the start of
the mission. If you are real strict and only want to grab a single rope arrow
(in place of a set of 2), then do the white or blue cave first, then pick up
the lone rope arrow from the transporter room before you go to the red/green
caves. From the same cave as the entrance to the room with Kelvin was also
another exit up to the top level of the green cave system. As far as I know,
this is the only place in the entire mission where two separate cave systems
are interconnected. This meant I didn’t have to go down to the teleporter in
the big lava cave in order to get to the green cave system. The orb in the
green caves was easier, because there was no stationary enemy around. I just
had to wait for the patrollers to go over towards the exit in the west and
then frob the orb (right image below).
Big Lava Cave There
was no need to venture near the top of the big lava rock, plus the fire
elementals couldn’t see me dropping from the colored caves anyway. The only
problem in this cave was entering the teleportation room (left image below).
This was the only way to reach the remaining two cave systems (white and
blue). I made a healthy attempt at leaping up to the ledges from atop the
central rock, but there was no way. With a speed potion I’d reckon I could do
it, but that is against Supreme rules, so what’s the point. Entering the
teleport room required frobbing a white button to raise the particle door.
This triggered spitfire traps inside and outside the hallway. After experimenting,
I think the outside trap triggers from touching the floor anywhere on the
stairs or in the first ¾ of the hallway. Since I had to frob the door and
wait for it to open, there was no way to reach the inner room without
touching the floor, so that trap always got set off. With the reduced
gravity, I could leap from below the stairs and frob the door open in
mid-air, but I always landed before being able to continue. The hallway traps
I believe triggered from the amount of time spent in there, so they didn’t
always go off if I was quick. After the particle wall was raised, I could get
in there without triggering any further traps by leaping, so it just ended up
being the one bust. The door couldn’t be closed back up.
White/Blue Caves The
white cave system was the hardest. There seemed to be more enemies than in
the other caves. The middle floor was short, but difficult. The exit hole was
in the same cave as where I entered, but two light orbs made the room
difficult to navigate (right image above). Three patrollers made it tough to
gauge the descent from the top level, so I had to wait a bit and just hope
for the best. I had to sneak across the entrance to the east tunnel and make
it to the northern end, but this was slow as there was usually at least one
patroller facing me. The jellyfishes I still have a hard time detecting alert
levels from. There was also a stationary charaka down the east tunnel that
could spot me crossing its line of sight. Once
on the lower level, it didn’t get much easier. The orb room was very lit, and
I again had to wait for enemies to wander off, which meant down the western
tunnel towards the exit. The biggest problem was the different speeds of the
enemies. The jellyfishes (especially the smaller ones) were so slow they
would take forever to circle the orb, but then the instant they had their
backs turned, the fast club zombie would come pacing back out. Eventually it
worked out to my benefit and I got the orb frobbed unseen. Next I had to make
my way down the same tunnel all the enemies had congregated in (left image
below). This was the only way to the exit and another very difficult task. A
light orb shone right in the middle of it, so patrollers either had to be
gone or have their backs turned. Not only that, but there was another charaka
positioned at the end of the tunnel to the right. Luckily there was some
shade towards the end on the left hand side, so I snuck over the lip and
found my way to the exit. Tight one that.
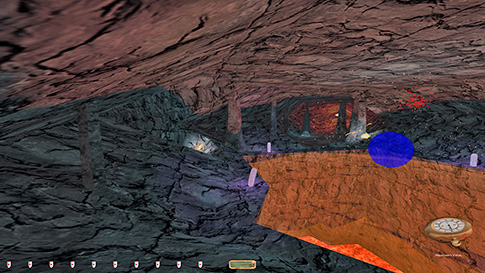
Teleported
over to the blue cave last. This one was easy apart from the orb situation.
The types of traps were different in each cave, and this one had fireballs,
which deals a lot of splash damage. Furthermore, some of the shots after the
first batch were sent outside the main lava pool, standing the risk of
damaging nearby enemies (right image above). This would alert them, even if
they were only in the outer fringe of the splash damage. I thus had to make
sure they were all down the east passage, and far enough away to avoid any
damage at that. This meant a lot of save scumming to get the right RNG
situation. Tedious, but it was the only way to avoid the Ghost bust.
Following, I had to wait for them all to leave that very cave so that I could
sneak down. Another charaka at the end here, but a nice patch of shade
covered his vision. Flipped
all the stars and headed to the end. A long camvator sequence now took place,
a good 8 minutes long. I was spotted by the asteroid dudes at the start of
the sequence, but such busts don’t count, as I wasn’t able to move. Really
looking forward to the rest of this series. Statistics: Time: 1:25:37 Loot: 1000 out of 1000 Pickpockets: None Secrets: None Locks Picked: None Damage Dealt: 0 Damage Taken: 0 Consumables: None Ghost: Success! Perfect Thief: Success! Supreme Thief: Failed! Perfect Supreme Thief: Failed! |
|
Notes: -
Triggered traps in each of the four colored caves when frobbing the
respective orbs. This didn’t alert any enemies, but you’re not allowed to
trigger traps for Supreme. -
Triggered another trap when opening the particle wall to the
transporter room in the big lava cave. Additional Supreme bust. |