|
Morbid Curiosity VIDEO REPORT (Narrated Run) VIDEO REPORT (Segmented Run) Reading
the comments in the ‘Best Fan Mission of 2016’ thread over at TTLG opened my
eyes to this masterpiece. Several players claimed this to be their favorite
mission of the year. After my first playthrough, I
can’t say I disagree. It was even good enough to interrupt my long awaited NewDark Supreme Ghost run of Thief Gold three missions
in. More impressive still, this is Pukey Brunster’s first release! Although it clearly wasn’t made
for ghosters, I was looking forward to the
challenge. Supreme was guaranteed to be unsuccessful, but I was gonna go down guns blazing. My
initial tasks were simple. Get to the Swinging Taffer
Inn, read my fence Peyton’s letter, and grab some gear. We were also
instructed not to steal from anyone visiting the inn. More duties were to
follow later. Swinging Taffer
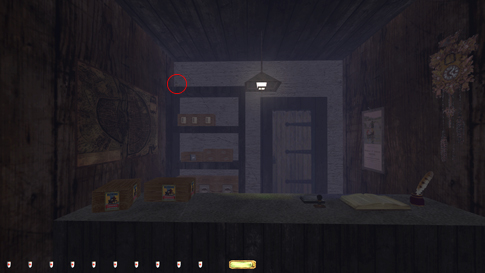
Inn…and Out I
started by the shore of the canal in the far south, directly underneath the
guardhouse. Hit a snag right off the bat. The swordsman patrolling the
opposite side alerted when opening the large entry door (left image below).
He never settled and probably maintained a constant first alert state due to
using that door on a regular basis. This left me hesitant to using that route
to enter the guardhouse. I knew there was another safe way in from the street
level anyway, so I left that guard be for now. There were two other ways up
to the streets. One was through the offices of Vance Shipping, but that
required unlocking the entrance door using the key from one of the desks
there. I wanted to avoid picking up keys unnecessarily, especially since this
mission employs the keychain, where keys can’t be returned for Supreme.
Returning keys isn’t enforced if they stick to your inventory, but rule #13
still prohibits picking up items you don’t need. I instead cleaned the
offices for loot, including the hard-to-find spice bag in the reception
(right image below), only to descend back down to the canal through the crate
chute.
I
could grab the guard chest key through the grated window from atop a big
crate east of the canal. That avoided having to utilize the aforementioned
big door with the patrolling guard. Also found some tiny coins on the metal
beam above and through the manhole leading to the locked off section of the
street (left image below). From the same beam I could access a second manhole
further north. This was the third and last way to access the streets. Two
swordsmen had slightly different patrols through this fountain plaza, and
they both could alert to the manhole opening, so I listened for footsteps
before emerging.
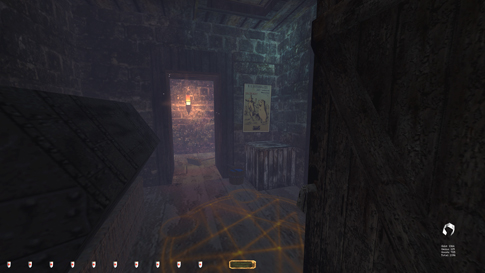
The
intended route past the locked gate in the southwest involved dodging a
spider in the underground sewers. It could easily be done without alerts, but
I couldn’t reset the vermin gate controls until later. There was nothing else
of interest down there, so I skipped that whole section. I instead mantled
the wall by the gate using the sewer manhole cover and a nearby lamp (right
image above). The two street guards plus two more guards on a balcony to the
south could see me make the leap, so I had to properly time the patrols to
make it work. The
inn was devoid of enemies, so I got my gear and objectives without
interruptions. My main task was getting the Builder’s Rattle from the hammer
abbey in the north. In addition, I had to get a sword and some rope arrow,
steal 4,000 in loot, visit the pawnshop, and figure out why Brockwyn was tailing Peyton. A busy night indeed. Taking
any of the gold in the guest rooms failed the mission. They didn’t count as
loot anyway, so no value missed there. I loved the warm and welcoming feeling
exuded by the inn. The kitchen scene was my favorite, with the cook’s grin
absolutely perfect (left image below). To get rope arrows, I had to visit the
Jacksberry Garden Shoppe via the basement sewers.
Along the way I stumbled upon two more spiders. They were guarding a box with
a spice bag (right image below). Coming from the vent, it was tough enough
just passing the generator without alerts. I suspect the spider was able to
see through it. The box had to be picked open, spawning a first alert from
the patroller. There was a small part of his route, at the western end, where
he didn’t alert for about a second. But there was no way for me to get out of
the way quick enough afterwards not to get caught. If there had been, I
could’ve picked the lock in one-second increments and avoided the Supreme
skip. Alas, it had to be passed up for that mode. I predicted it would be the
first of many.
My
prediction got verified already at the garden shop. The only pieces of loot
there, two spice bags in the laboratory safe, also had to be skipped for
Supreme. Picking the safe lock alerted one of the nearby frogs. Neither of
them alerted to anything else though, which was strange. They didn’t see me
standing in the light or hear me jumping about. For some reason though, those
lockpicks triggered them every single time. Oh
well, such is life. The rest of the building was easy. I left the entry door
key be and returned through the sewers to the inn. It saved me another
unnecessary pickup. It was difficult to dodge the sewer spider passing back
through the generator room. I had to time it from the southwest corner to
leave successfully. Guards and Such With
ropes and lockpicks, I was fairly free to roam
wherever. I decided to try to avoid picking any of the four town gates
though. It would add a nice challenge, plus I generally try to avoid picking
locks for Supreme. Brought the only piece of loot left in the southwest part
of town. A spice bag on a rafter outside the Rattoner
(left image below). With that I roped back across the western gate and got
ready to tackle the guard house. I
entered through the upper balcony door. Used the wooden planter boxes to
ascend and hid around the corner to the west (right image below). Two archers
patrolled the balcony on occasion, but I could slip in behind them quite
easily. You could get upstairs from the first floor too, but not without
picking locks. The floor above (the top floor) held the captain of the guard
in a sparring room. He was in a constant third level alert state due to the
practice dummy. All I needed was his key, which was easy enough to steal. A
hidden vent from the rafters led me near a crawlspace bedroom with some loot.
The other end of the shafts took me to the guards’ barracks downstairs. I
could now pick up the captain’s sword from his office; another objective
checked.
Reentered
the guard house through the street access a bit east of the balcony. A lone
swordsman patrolled this floor, between the downstairs hallway and the prison
office. The loot past the prison had to be skipped for Supreme, another 100
loot missed for that mode. Although the jailbirds never went to hunt or alarm
mode, they all first alerted like normal, so I took that as Supreme busts.
There was no way of passing the hall by the cell without such alerts. It was
either that or dousing the torch, which the inmates also complained on and
which is a bust to Supreme regardless, so no dice. I guess you could come
back here later and see if the prisoners have moved. I did this once, and the
woman that always alerts was tucked in the nearest corner, out of sight. The
guy doing the squats was still facing the bars. I imagine one might encounter
a situation where you can pass this hallway unseen, although I wasn’t
interested in experimenting any further. It borderlined
engine exploitation, so I rather took the skip. They also alerted to me
opening the northern door to this hallway, although this could be
circumvented by waiting in the shadows outside for the guard to come by. As
he opened the door, I simply blocked it shut; then when leaving, I frobbed it so the guard blocked it (left image below),
then he would close it himself on the way out. A nice trick to avoid alerts
from doors utilized by enemies. I
couldn’t pass the gate northeast of the south plaza without picking the lock.
The archer on the lookout had too tight of a patrol. It was a nice challenge
getting his arrows though, and to get out of there dodging the swordsman
below. Instead I headed east, past The Ornery Boar. A few more pieces of loot
in this area, including some well-hidden coins on a windowsill just east of
The Blue Knight Inn (right image below). Had to skip Benny’s lunchbox for
Supreme. He gave a comment when opening his cellar hideout. This would mean
another 100 loot gone for that mode down the road.
Far East Mantled
the next gate without issues. Headed north from here and cleaned the weaponsmith’s effortlessly. Found some more loot behind a
hidden wall-panel here. The swordsman in this area could spot me through the
store window. Entered the daily news past the next plaza. The front door was
locked and unpickable, but I found an open window
and an unlocked back door on the north side. An attic space with some loot
and a pipe to the roof across the street. I love it when missions freely let
you explore vertically. I was rewarded with a single gas arrow. One
of my favorite places in the mission was the smuggler’s warehouses to the
east (left image below). Its tight corridors offered a nice changeup from the
open streets plazas. I barely fit behind the first thief by the hidden
entrance without nudging. Lucky, as you’re not allowed to push enemies for
Supreme Ghost (only a last resort for plain Ghost, but at least it’s allowed
for that mode). If not I would’ve had to go in through the gate by the
homeless people, but I wanted to avoid picking that lock if at all possible.
Both the thief on the second floor and the female arbalist in the streets
could hear me picking the lock on the footlocker with the valuable dice. I
needed three patrol cycles to go by before getting enough time to finish the
pick. It wasn’t a difficult lock, but there was only a few seconds to spare.
No
further problems until I got close to Brockwyn’s
main office. One of my objectives was in there, so no skipping this place. A
thief patrolled from a receiving bay, through a few hallways and into a
meeting room of sorts. He circled the table in this room and headed back
through the hallways. The hallway closest to the meeting room had another
stationary thief, facing away. He commented on either door leading to this
hallway opening or closing, plus he heard me picking the lock on the door to
the inner office, if the meeting
room door was open. I could easily follow the patroller and block the hallway
doors open. There was a dark spot in the first hallway where I could hide and
wait for the thief to pass going west. The trouble was shutting the meeting
room door in order to reach the office safely. I found I had to wait behind
the open door and close it right as the thief came in (right image above).
With a bit of luck (and good timing), he would open it just before it shut to
make noise, then he would close it himself before starting his dance around
the table. I had to stay right on his heels until he left the room, as there
was no shade anywhere. Cleaned the office next. On my way back I
had to use a similar tactic. I stopped the door as he left the meeting room.
Luckily, the other thief didn’t alert to me closing the office door. I guess lockpick sounds travel farther than door closing sounds.
When the patroller came back going west to east, I planned to close the
meeting room door and have him block it like before. I had to follow him from
behind to do this and it was difficult to hide without getting a first alert
when he passed. The lights in the west hallway flickered somewhat, and
standing in exactly the same spot sometimes yielded a comment and other times
not (left image below). Also, thieves patrol rather fast and keeping up
without him hearing me was tough, especially on wood floors. I could lean
forward and reach the meeting room door without fully entering the second
hallway. I had to do this whole setup a second time to close the last door I
had left open also. Overall, this was the toughest area in the mission so far,
but with Supreme still intact.
I
got the psychic’s key from the homeless girls for regular Ghost. As mentioned
earlier though, I did not pick the
lock on the gate to the underground tunnels. I planned on getting to Madame
Rowena’s via another route. Looted the blacksmith’s first. Couldn’t get the
nugget in the basement footlocker for Supreme. The smithy heard the door open
(right image above). I tried for the life of me to pull the gate control
lever from the outside, but the frob distance was
too low. Normally you can lean through gates and portcullises, but that
didn’t work here. Another piece of loot skipped for Supreme then, a total of
370 so far, including the ring at Cartwright’s coming up. Headed
back to the second floor of the thieves’ warehouses. Was planning on reaching
the underground tunnels (and the psychic’s for regular Ghost) via the wells,
but realized that the patroller heard me enter the water even with the door
closed. I even timed it so that he was the farthest away from the well, and
he still alerted to hunt mode. A rope arrow from the ceiling silenced the
drop, but then he first alerted when entering the room. There was no way to
reach the rope from the water either. I bit the sour apple (as we say in
Norway) and revisited the gate by the homeless people. This was the only
remaining safe way to the tunnels. The only item of interest for Supreme was
a purse on another roaming thief. For Ghost I got the aspirin pill from
Rowena’s safe also. Didn’t take her key though, as I could retrace my steps
all the way to outside the daily news. Made sure to reset the elevator and
close all the panels along the way. Postage and Other Tidbits Visited
Perciville Cartwright’s for regular Ghost. I guess
he was one of the town doctors, though his methods were highly questionable.
Skipped the entire establishment for Supreme. Putting the aspirin in his
coffee upstairs opened his downstairs “clinic”. There was a ring in there,
but staying in the room too long damaged me from the toxic ether. Managed to
get it without injuries though (left image below). This area also counted as
a secret.
Got
a new objective at the pawnshop. I was to deliver six parcels to different
establishments around town. Seemed like a decent thing to do I guess. Took
care of the news editor first. I actually ended up delivering it through the
gate from the inside. Passing through the lit plaza was too risky with that
wary archer on the gate to the southwest. Skipped the butcher’s for now. I
wasn’t sure on how to tackle the burricks in the
basement just yet. Perhaps I could come in from below. Found two masks in an
attic just northwest of here (right image above). Had to rope arrow to a
nearby ledge to get in. Cleaned the dressmaker in this area also. Dropped to
the streets after this and worked my way east. The
swordsman at the market plaza was very difficult to deal with. He patrolled
faster than the other guards, almost like a thief. In fact, I suspect it
being a thief in a guard’s (or wolf in a sheep’s?) clothing, as he seemed to
alert much easier than anyone else in the area. Picking the door to the dairy
store was tough without him noticing. He even alerted to picking the box of
loot inside the store! Managed to time his route well enough to avoid busts,
but it was a pickle. Found some hidden coins at the market close by (left
image below). There were more coins in the alley by the spell shop too. When
visiting the fishmonger, one of the guards had gotten stuck in the northeast
fountain and heard me opening the entry grate. I had to replay about 20
minutes to free him up. Annoying, but I guess it could’ve been worse.
Pillaged the bakery and produce store, no issues. Delivered my final package
at the potter’s and checked off that objective.
Moved
west along the northern part of town. Found another spice bag in a hidden
attic space southwest of the abbey. The metal rafters crossing the street
gave it away. Dropped into the canal just north of the bridge (right image
above). Three swordsmen patrolled the streets here, but nobody heard me get
wet. The gallery couldn’t be entered via this route. Instead I swam south and
cleaned out the three remaining areas from below. The first was a basement
service station of some sort. One piece of loot, a silver vambrace,
and a patrolling ghost (left image below). He was tough to spot, but the
swarming bugs helped. Killing him would spawn one of the four fountain keys.
However, this is strictly against all ghost rules and had to be skipped. The
500 loot resulting from the secret of the keys could therefore not be
obtained. Perfect Thief just left the building, sad but true. The
bookseller’s was devoid of individuals and I robbed his safe in peace.
Further
east I bumped into a couple of housebreakers. One was doing a lookout patrol
while the other attempted to open a nearby door. I anticipated this to be a
tricky situation, as the guy by the door had loot on his belt. All I had to
do though was follow the patroller and slip by him on the right (right image
above). This area also had a locked door leading to the butcher’s burrick stables. It was pickable
and could be opened without the patrolling thief noticing. It had to be done
in increments though, and always alerted the burricks
inside. I found it more discreet to skip it and attempt to get in from the
streets. I backtracked to the abbey and circled the streets to the butcher’s
main entrance. I could get to the basement without alerts, but opening the
door to the stables again spawned a first alert. By rushing in behind the
critters, I could take the coins in the corner without further alerts.
Regrettably, this was another piece of loot needed to be skipped for Supreme. Hammerite’s Abbey
& Crypt The
abbey presented a nice change of pace. I liked the ambient music and relaxing
atmosphere. Three patrollers and two stationary staff members, but there was
enough room to move around quite straightforwardly. Managed to read the
bell-ringer’s journal without alerts (left image below). I’ve started to
enjoy the challenge of reading as many texts as possible for Supreme.
Ultimately, wherever I can add extra tasks that harmonizes with the Supreme
rule set, I’ll take it. To a thief, information can be as valuable as gold.
Upstairs, the kitchen servant was actually the most difficult one to pass. I
had to creep-crouch through the southern doorway to avoid a comment. In the
guards’ bedroom, the northeast bunk bed was the only place to hide from the
patroller (right image below). I could take the rings through the banner in
the opposite corner. This is not considered an engine exploit towards
Supreme. Slashing the banner isn’t allowed when ghosting, although that was
the only way to get the secret count.
The
rest of this building didn’t pose any problems. Both the library key and
Saint Merek’s hammer disappeared upon use, so no
need to return anything for Supreme. Using the holy water arrow to enter the
crypt is allowed for all modes, since I could use the font and not a holy
water vial to bless my arrow. The use of potions is not allowed for the
Supreme Ghost mode. Getting Frick and Xander’s
hammers wasn’t that tough. There was a dark spot right outside each doorway
where I could observe them both (left image below). It was tense, but just
standard sneaking. Made sure to get the loot from the caskets before opening their tombs. Swimming
through the flooded mausoleum took a bit of practice. I couldn’t get the gold
nuggets on my way past without losing health. Using a breath potion is against
Supreme rules, and I didn’t want to take a bust (at least not yet). Instead,
I swam all the way through and emerged in the north gatehouse. Then I caught
my breath and went back down to get the loot from this end. The distance
must’ve been less, as I could get both nuggets and return with oxygen to
spare. Dodged the fire shadow at the north gatehouse quite easily. Found a
nicely hidden purse on a ledge by one of the torches there (right image
below). Had to take the north gatehouse key upstairs to proceed; a necessary
pickup. Arrived at the gallery by the boarded up canal delivery entrance.
Gallery Di Grimaldi I
had tried squeezing past the boards in my initial blackjack run, but felt
like I never really gave it a proper shot. That was not going to happen this
time. If it was possible, I was going to do it, come what may. After all,
property damage violates both Supreme and
regular Ghost. No crates or other movable objects around, so I was limited to
weapons and inventory items. I could get on top of the upper board using a
stack of items or a rope arrow. Since Supreme frowns upon item pickups, the
rope was my best bet. Climbing up, I could swing around about 90 degrees,
retrieve the rope and land on the edge of the board, still on the outside. I
could even crouch and lean from up there. Leaning through on the west side
usually got me stuck just inside the doorframe. Jumping from this position
either did nothing or pushed me back to the north side. A few times though,
wiggling my mouse while leaning, I fell down on the inside. My point of view
was clearly inside both boards, but I was still unable to go anywhere. I
tried shooting more rope arrows straight up, trying to use their attraction
to propel me free from the boards. Regardless, it didn’t matter what I tried
in this position, it got me nowhere. At this point I was about ready to give
up. Then I got the idea of trying to place a rope hanging down right into the
top board. My thought was perhaps I could manage to grab it as I leaned
through the hole the way I had done earlier. If Garrett is partly stuck
somewhere, but able to grab a rope, the magnetic effect of the rope can
sometimes exert a force great enough to fling you in the direction of least
resistance. I figured if I was pushed through far enough on the south side, I
might be hurled into the hallway. That is exactly what happened! It was a
shock when I suddenly landed a good 6-8 feet away from the door (left image
below). A big sigh of relief came as I realized I had avoided the bust. I
have repeated this maneuver multiple times, proving it was not a fluke
encounter. I don’t even consider this an engine exploit, which would’ve been
a bust to Supreme. In my opinion, a thief fitting through the top corner is
plausible enough.
Turned
off the fog inside the gallery. It was more unrealistic than immersive there
anyway. Got my first undeniable Supreme bust entering the curator’s secret
chamber. A book in the main office opened a hidden doorway leading to said
chamber. Inside was what I assume to be the curator himself, zombified. Opening the door triggered a growl
constituting a first alert (right image above). Absolutely no way around that
one. To be honest, I was surprised that mode had stayed intact this long.
Last time I played I encountered him facing the door though. I remember I had
to douse the hallway candle to avoid a second level alert. I’m not sure what
determines his angle, but this was definitely preferred. Dewdrop
disappeared and left behind the front entrance control key. I didn’t pick it
up for now, though I was quite sure I’d end up needing it. Had to skip the
‘Strange Creatures’ exhibit for Supreme. All five creatures in there saw me
go for the loot. For regular ghost I had to douse two lamps, the one outside
the entry and the one in the corner by the loot. There was also a second lamp
in there that lit me rounding the corner. Occasionally the stationary green
sprite saw me and started searching, but I eventually got in and out without
a bust (left image below).
Upstairs
I got spawned into the closed-off gift shop. It seemed like Dewdrop was
behind the shenanigans. Had to hide in the corner of the shop not to get
caught by the spawning zombie (right image above). It only took a few seconds
before it appeared, but that was more than enough time. It disappeared after
not too long. Got the gallery tour token and left the gift shop doors open.
Looted the pavilion without issues. Heading for the gallery tour, the
Unrequited Hand entity was loose, patrolling (or floating) around the upper
floor walkway. It was totally deaf, but could see me like a normal enemy. I
just followed it clockwise around the room to avoid it. The Gallery Tour I
could raise the token statue, so I did that for Supreme. I could not,
however, close the entry door. The second door closed on its own and the
elevator could be raised back up once in the underworld section. The purse in
the zombie pit was not a problem, but it was difficult to differentiate
alerts from the scripted groans. I think the patrolling zombie upstairs also
alerted to the noises below. More difficult still were the skeletons in the
upcoming exhibits. I could choose which way to go to pass this area. My best
bet would be towards the right. There was only one skeleton here, and it
circled a zombie corpse rather angrily. Occasionally, it would have its back
turned enough for me to make a dash for it. Dousing a few torches would’ve
made it heaps easier, but I wanted to avoid that at all costs. It didn’t take
too long before I rushed past it unseen. It didn’t give any verbal cues, so
as long as it didn’t come charging, I was fine. Found a hidden control room
just past this area (left image below). A switch turned off all the
protective seals for the valuables and removed the barriers between the
different tour sections. This was another bust to Supreme, as disabling
security systems is not allowed following rule #8. The lever wasn’t frobbable afterwards, so there was no way to reset the
system. [UPDATE 5/28/2020: Recently discussed
in the ghosting discussion thread on the forum was the definition of “security
systems” in rule #8. We came to a semi-conclusion that it only involved
systems that are meant to catch an intruder and alert to his presence, as in
watchers or alarm systems. It does not
include measures meant to hurt the player, like protective seals or traps.
Those are still allowed to disable for Supreme. Thus, flipping the lever
described above is no longer considered a bust for that mode.]
The
tormentor was intimidating enough, but no problem to sneak past. The other
phantoms here didn’t alert at all. Reached my loot goal for regular Ghost
when grabbing the treasures. Got my first statuette also, before leaving the
underworld. Nothing to report from the Lost City. The
mummy in the Keepers section was tough mostly due to tiled floors and few
shadows. Rope arrowed up in the dining hall to get the loot there and wait
for him to pass (right image above). More loot in the storage closet up
ahead. Nothing else to report from this section, although I have to say the
librarian’s dungeon was one of the creepiest places I’ve ever visited. The
Old Quarter wasn’t that difficult, as haunts are easy to hear alerts from and
quite predictable in nature. The most challenging place was getting the
rattle. Picking the lengthy lock required two trips. Both haunts had this
room as part of their route, and there were no shadows in there at all. I had
to hide up the stairs close to the exit for the one haunt to head back. The
archer haunt only went to the chapel and back. For some reason, the other
haunt alerted to something in the chapel long before I got there, and this
put him in a constant first alert mode. I could tell as he was laughing
relentlessly. It wasn’t a big deal, it just meant I had to rely on hardcover
to evade his looks. I also saw the archer haunt take damage at one point,
right as he was entering the chapel. I only saw it once, but that could’ve
been what the other haunt alerted to. The
big problem came in the pagan forest. In order to bless the rattle, I had to
use one of each elemental arrow on four flower pots surrounding the blessing
pool. The southernmost pot required the use of a fire arrow, and therein lay
the conundrum. No less than five
enemies heard the shot, going straight to hunt mode; three ape beasts up
above and the two haunts in the old quarter. If I was to get rid of this
bust, I had to think of something utterly ingenious. The main problem was
nothing can deaden the noise of fire arrows. Not the surface you’re hitting,
not the drawstring pullback, not the angle of impact, nothing. The only
variables were the positions of the enemies. Also, when the blessing pool
activated, it made a noise almost like broken glass. I’m not sure if this
alerted the enemies further, but it made doing the fire shot last highly
desirable. Luckily, two of the patrollers had such long routes that they
didn’t hear the shot if they were at the farthest end of their path. The
patrolling swordsman haunt had part of his patrol behind the doors at the
beginning of the old quarter section. One of the apes likewise patrolled well
into the maw of chaos section by the tree beast. The latter normally didn’t
come back from his patrol once he left the pagan forest, which indicated he
was so far away the engine no longer prioritized it. That left three enemies.
One of them was a stationary ape on a bridge directly above the pool. The
only way to manipulate his position would be to nudge him. I imagined up the
ramp and through the portal would be possible. However, I quickly realized
the only place he ended up was through the vined railing to his front and
into the water below. This caused him to drown, which is in violation of
Ghost rule #5: “Garrett must not cause suicides of AI”. Yet, his body was
already somewhat through the railing when I started the nudging, which made
me think perhaps he moved on his own. Watching him for a few minutes made it
apparent that he did, and markedly so. After about 10 minutes, his entire
body was outside the railing (left image below). A few minutes later, he
dropped to where the top of the railing was at his armpits. At this point he
didn’t move forward any longer, but instead started to slide left. When I by
accident saved and reloaded, he fell to his death instantly (right image
below). This is not in breach of
rule #5, as Garrett wasn’t the cause of the suicide. Instead, it is probably
an engine exploit and hence a (small) bust to Supreme rule #11. For regular
Ghost, such exploits are allowed as a last resort.
Three
down, two to go. First I found I could activate the pool by shooting the fire
arrow into the ground a foot or so on the south side of the pot. Every inch
helped. Next I timed the final ape beast and the archer haunt so they would
be farthest away. The ape walked through a dark, empty exhibit somewhat north
of the pool, while the haunt patrolled all the way past the double-doors by
the Scripture of the Master Builder. I had to wait quite a few cycles before
their routes were synchronized. I also had to make sure the other patrollers
were away. Finally, after a lot of prepping, the moment of truth had arrived.
I shot the arrow, activated the pool and ran up to check. The ape beast was
in a definite second level alert mode. In the old quarter, the archer haunt
was also roaming around looking for me, alerting the other haunt in the
process, who now had reappeared and was on his way towards the chapel. I
replayed the scenario half a dozen times, with exactly the same results. In
the end, it was an easy bust to accept. After all, I had tried everything
under the sun. Unless I am missing something very obvious, I don’t see this
situation ever to be ghostable. Please chime in if
you have any suggestions. I am open to all ideas. It
was very difficult to get the gas
arrows above the bridge in the maw section without any first alerts. But
doable it was, and a nice challenge at that. Took both patience and a bit of
luck to get past both the ape and the tree beast in order to finally leave
the gallery tour. Wrap-Up In
order to leave the gallery, I had to use the front entrance key. There was no
way to get back through the boarded delivery entrance door. Since the boards
are on the outside, there’s no way to get on top of them and thus no way to
lean through. I tried a bit with some ropes, but didn’t even get close. This
also meant I had to leave the front door open, as I couldn’t reach the lever
from the outside. I almost accepted the additional Supreme bust, when I
rather dumbfounded thought of the obvious solution of blocking the door.
After a bit of testing, I realized any potion or vial would do. Looking
through my equipment list, the closest and easiest to return was the holy
water vial from the basement in the north gatehouse. There was one by the
corpse close to the patrolling fire shadow. Sure enough, it did the trick
(left image below).
Since
I couldn’t get the mission’s last piece of loot without slaying the beast by
the canal, I skipped getting any of the fountain keys for Supreme. Besides,
that mode doesn’t like cluttering up the inventory. If you value maximum loot
over the extra bust, go right ahead. With this difficult of a mission, I can
totally see that decision justified. The stats will then display 1 back stab,
30 damage dealt and 1 others killed. Once getting all four keys, an extra
objective spawns to discover their use. At that point, it is a mandatory task
for Supreme, despite saying ‘optional’. After killing the beast though, you
don’t have to take any further Supreme busts to get the key to the city
(right image above). The stats below are from my regular Ghost run. What an
incredible mission! Statistics: Time: 5:11:57 Loot: 5487 out of 5987 (Supreme: 4797) Pickpockets: 15 out of 16 Secrets: 5 out of 6 Locks Picked: 38 Damage Dealt: 0 Damage Taken: 0 Consumables: 4 water arrows (only 2 for Supreme),
1 moss arrow, 1 gas arrow and 1 fire arrow. Ghost: Failed! Perfect Thief: Failed! Supreme Thief: Failed! Perfect Supreme Thief: Failed! Notes: -
Skipped a spice bag (40) in toolbox in the sewers for
Supreme. The nearby patrolling spider alerted to the lockpicks. -
Skipped two more spice bags (80) in safe at the Garden
Shoppe. Again the lockpicks caused an alert, this
time from one of the laboratory frogs. -
Also skipped a spice bag (40) and a coin pair (60) in
the storage closet in the prison office at the Guard House for Supreme. The
prisoners alerted when passing the hallway leading to the office. The
prisoners shifted position quite a bit during the mission and you might be
lucky and find them facing away or tucked away in a corner at some point,
enough for you to pass the hallway unseen. I did not encounter such a
scenario, and I wasn’t interested in experimenting, as engine exploits aren’t
allowed for that mode anyway. -
Skipped a silver nugget worth 50 at the blacksmith’s
for Supreme. He alerted to the basement door opening. -
Skipped the ring (100) in the secret lab at
Cartwright’s for Supreme. Taking Benny’s lunchbox, which is needed to reach
the psychic’s and get Cartwright’s pill, can’t be taken without spawning his
comment. -
A pair of coins (20) in the butcher’s burrick stables had to be skipped for Supreme. The burricks heard the door to the gate control room open. -
Couldn’t get the key to the city worth 500 gold.
Killing the ghost in the canal power room busts all ghost modes and is
necessary to get one of the fountain keys. -
Busted Supreme when opening the door to the gallery
curator’s secret office chamber. He gave a first alert when opening the door. -
Skipped the loot (300) in the ‘strange creatures’
exhibit at the gallery for Supreme. No way to get in there without alerts.
Used two water arrows for regular Ghost. -
Waited for the stationary ape above the blessing pool
to fidget into the water and drown. I counted this as an engine exploit,
which is not allowed for Supreme. -
Busted Ghost when activating the blessing pool in the
pagan forest. The patrolling ape beast above and the archer haunt nearby went
to second level alert mode. The other patrolling haunt in the old quarter
also alerted to the first haunt already searching. |
|
|