|
Patriot, Mission 7: Heretic In
my opinion, this is the best mission in the campaign so far. An enormous step
up from Pathfinder. A daytime breakout mission in a mechanist monastery, with
lots of side quests and surprises along the way. Zontik
is sailing up as one of my all-time favorite authors. Every twist and turn is
based on a new idea, executed to perfection. Everyone, do not let a foreign
language make you turn down this masterpiece of a creation. My
initial tasks sounded simple; find the major and bring him out of the
monastery, picking up at least 2,000 worth of valuables along the way. It
would end up being slightly more complicated than that, but all in due time. I
always try to reduce the amount of items I pick up and the number of doors I
unlock, especially if I can’t relock them. There were a few such doors in
this mission that could be unbolted from one side only, but thereafter
couldn’t be locked up. These I wanted to avoid. In addition, a lady Morra responded to some of my actions by performing
scripted changes to the environment, often involving doors or lights.
Likewise I wanted to reduce those. This especially involved an optional
objective of marking the basement entry door with a piece of chalk. This
would also change the exit objective and render the mission impossible to
Supreme. Guest Hall Getting
into the guest hall thus presented a problem. The intended way was via a
chimney arriving in the fireplace, but this triggered Morra
to knock down the ladder. The only way to get there without using this ladder
was by mantling the fence in the courtyard with a well-timed jump from the
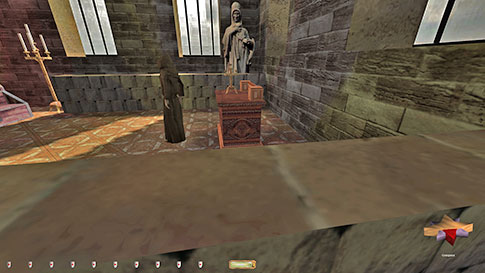
big staircase (left image below). The guest hall itself was very tough. I
couldn’t walk far into the room without getting lit up, so I stuck close to
the walls. Most enemies were located on the east side, while the majority of
the loot was to the west. Two conversing noblemen to the east didn’t first
alert, so I could grab the purse from one of them unseen. Then circled the
room counterclockwise. Another nobleman by a window only turned around when a
patrolling mechanist came by. The biggest problem was a stationary monk close
to the dining tables (right image below). He never turned and was facing
southeast. I used the southwest corner of the hall to time my runs over to
the tables in order to get the gold plates. There were 10 in total, but I had
to skip the 2 on the eastern end for Supreme. One could be taken with just a
first alert, but the other required dousing the torches on the nearby pillar.
Not a problem for Ghost. I was quite close to getting one of them without a
comment, so I imagine perhaps it could be done, but I wasn’t able to find the
right method. Grabbed the baths key also from the blue monk before leaving
through the gate.
Looted
the guard house without issues. The archive key upstairs was necessary, but
taking it made Morra lock the door down the stairs.
I could get back out again without picking it, as at least two patrollers
used it along their route. I waited for one of them to come by. I would have
wanted to use the eastern walkway to reach the refectory, but that wasn’t
possible for Supreme. The guard outside heard me open the door, however that
could be avoided by again waiting for one of the patrollers. But I was stuck
there, as I couldn’t get further without at least a first alert. I could
reach the refectory this way for regular ghost, but for Supreme I’d have to
find a different way. Continued
south and cleaned Abbot’s quarters without issues. There was a guard outside,
but this area of the stairs was shaded, despite being in the middle of the
day. One of the guards involved in a conversation in the pillar crypt ended
up patrolling inside these quarters, but since I hadn’t triggered it yet, the
compound was empty. Only took the loot, none of the keys here was needed. The
cathedral key could be useful, but there was a different way in. Grabbed one
rope arrow from the master bedroom; I would need one more later. Crypt Level Crossed
the walkway north to bypass the pillar crypts, and instead headed west.
Brought along a crate from the southwest storage room; I needed to come back
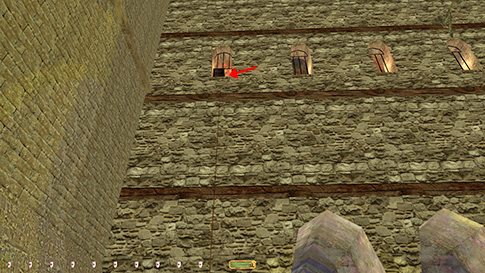
for at least one more. Visited the west chapel from the northern staircase. A
patroller came down here, so it was smart to wait for him to pass first. The
candelabra on the altar was the tough piece. I had to mantle up the ledge in
the northwest corner and observe the pivoting monk (left image below). As he
turned east, I mantled and dropped slowly into the northwest corner. With a
bit of luck, he would stay that way until I had taken the loot and gotten
back to the ledge with the statue. It took a few tries, but he luckily didn’t
pivot too often. The statue on the wall was easier.
Moved
via the northwest hallway into the cloister. Dropped the crate here and headed
back for another. Skipped the baths for now, as it would take away my square lockpick. Not sure if I would need it, but I waited just
to be safe. This time I went through the underground church and got the loot
there. The two crates were needed in one of the open windows in the cloister
(right image above). I use the easternmost one, to get them as far away from
the stationary monk here as possible. The reason for the crates were to block
the metal bars from closing the window once I visited the west wing the first
time around. The intended way to leave the northwest courtyard afterwards was
through the basement, but this required property damage to the barrels down
there, which busts both regular Ghost and as well as Supreme. I thus needed a
way out of the courtyard using two rope arrows and these crates. Galaer found a similar method, though he used three
crates; I assure you only two is needed. I tested by quickly fetching a
slow-fall potion and jumping through the window, triggering the event and roping
back up. Otherwise, you might need to redo the whole scenario much later.
Using the potion wasn’t a viable option besides for testing purposes; there
would be a different way down besides using the basement from the cathedral. In
the north crypt I ended up taking the chimney sweep key, while still managing
to block the door behind me as Morra closed it. In
order to get the extra bottle of wine outside the chimney tower, I needed
that key. I left the door open but locked, so that I could close it back up
once returning the key later. Looted the scriptorium and the basement next
without issues. West Wing Now
I had finally reached the refectory, since that wasn’t possible earlier from
the guard house. The monk in there had to be stationed northwest long enough
for me to sneak along the south wall away from the door. At a certain point
he seemed to lose sight of me and I could go faster. Cleaned the kitchen and
the open gallery easily enough. The monk raking leaves didn’t give any first
alerts.
In
my test run, my method of reaching the west wing was by jumping from the
cathedral’s north closet window. However, Galaer
found a better way that I cannot take any credit for. From the courtyard
south of the open gallery, mantle the torch, then up on the roof above (left
image above). Circling this roof north took me directly above the western
basement entrance (right image above). With an accurate drop, I could land in
a mantle behind the guard, without as much as a peep. The jump I had made
from the north closet was much more difficult. Now I could get the final
piece of loot from the basement and enter the west wing via one of the open
windows. The
only thing to do here was grab one piece of loot and read the notice outside
the prison gate. This updated the objectives to learn the correct bell signal
and toll it in order for the doorman to leave. Since I was done, I now had to
make my way up to the window I had previously blocked with the crates. Two
well-placed rope arrows did the trick. Luckily, they overlapped, so grabbing
the lowest made me grab hold of the upmost one. I could also mantle into the
window while grabbing the rope in the process. Getting past the boxes wasn’t
100% predictable, but normally grabbing the topmost box and then pushing just
past the gate did the trick. I couldn’t push fully onto the floor, as that
would spawn a first alert from the monk to the west. I
could now safely return the crates to the storage room, as they were no
longer needed. I also visited the baths to pick up the fuse along the way. Morra would lock the door, but I again blocked it. If
not, I would have to trigger the optional objective to chalk off the entry
door in the cellar basin. This would trigger several guards there later,
meaning I would have to use the hidden exit in the pillar crypts to leave.
This couldn’t be done without busting Supreme, thus it was imperative to not
read her letter. This was a safe move despite losing my square lockpick. I had already visited all the doors that
possibly needed to be lockpicked and as it turned
out, none did.
Next
I returned the chimney sweep key and then took the long way back through the
basement, the refectory and into the open gallery. Cleaned the archive room,
including the well hidden secret study. A book in here checked off one of the
new objectives. Morra for some reason turned on the
lights while I was here. Then I mantled onto the roof south of the garden like
before. This time, however, I leaped southwest onto the cathedral balcony
(right image above). Cathedral The
only problem in the cathedral were the two narrow walkways on the upper level
overlooking the chapel. Each of them had a patrolling monk. In the southern
one I had to hide on one of the windowsills; the outer ledge was difficult to
reach, but offered concealment (left image below). The northern section was
tougher. The door was locked and could only be opened by blocking the door
when the monk emerged. I could reach it from the shade around the corner, but
the monk gave a first alert when I frobbed it. It
was one of those doors in desperate need of some oil for the hinges.
Normally, enemies only alert to it opening or slamming shut, but not this one.
It was slow at closing, but even frobbing it just
before it shut still spawned an alert. Then I tried scooting in behind the
monk and blocking it with my body, but then he heard my footsteps. Finally I
found that if I took a fast step around the corner and quickly leaned
forward, my body would block the door just before it shut without needing to
make noise by stepping. This was one of those fun challenges that I don’t
think I’ve ever had to do and that took a few minutes to figure out, but was
very rewarding once successful.
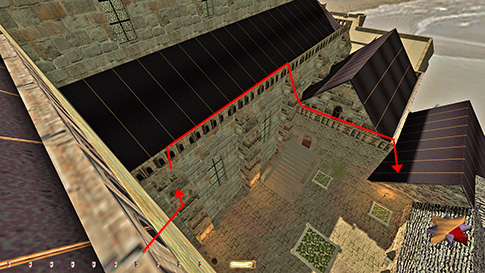
The
roof and bell tower were cleaned uneventfully. After tolling the bells, the
quickest way down to the west wing I found was via the roofs to the west. I
could exit via the west window just north of the entrance to the bell tower
room, by mantling the torch and furthermore the railing. The biggest obstacle
came in reaching the roof south of the courtyard by the open gallery. I had
to drop into a direct mantle from the roof to the east (right image above).
From there it was pretty much a straight shot. Back
in the west wing, the doorman had now made it to the aquilon.
I could take his key ring and enter the prison. I could drop it anywhere
along his route. If you wait 8 minutes past tolling the bell, the doorman
returns to the prison area and you can see his route. I had to lock block
several of the doors in order to return the key properly. Knocking out the
major was not a bust, as it followed the objective of getting him outside, plus
it was heavily implied by the events in the cell. I used the secret exit from
the cell to bring him to the ossuary. From
here, the rest was easy. Returned the baths key and the archive key before
looting the pillar crypts, just to avoid dealing with the extra patrollers.
Brought the major to the sewers and ended the mission. What a fantastic ride! Statistics: Time: 2:38:53 Loot: 3000 out of 3000 (Supreme: 2980) Pickpockets: 5 out of 5 Secrets: 12 out of 13 Locks Picked: 3 Back Stabs: 0 Knock Outs: 1 Damage Dealt: 1 Damage Taken: 0 Consumables: None Ghost: Success! Perfect Thief: Success! Supreme Thief: Success! J Perfect Supreme Thief: Failed! Notes: -
Skipped two golden plates worth 20 in the guest hall
for Supreme. The stationary monk wasn’t possible to fool. -
The 1 damage dealt and 1 knockout come from
blackjacking the major in order to bring him out of prison. Implied by
objective and not a bust. |
|
|