|
FEAST OF PILGRIMS - [Thief 2: The Metal Age 20th Anniversary Contest] The
winner of The Metal Age 20th Anniversary Contest, and for good
reason. By many coined as one of the best thieves’ highway missions of all
time, Random Taffer and Marbleman
has made something very special. Although I put Into the Odd just a tad
higher for innovation, Feast of Pilgrims is classic Thief 2, obviously
inspired by the game’s best mission, Life of the Party. If you still haven’t
played this one, do yourself a favor and get to it. My
initial task was fairly straight forward: Get to St. Ives Cathedral to steal
a chalice and some maps. I also needed to grab 3,500 worth of valuables along
the way. The free contract gave me three more optional objectives. Although
free items at the loadout screen are now deemed
allowed for Supreme (since they are not “purchases”), I didn’t actually read
it until I knew the objectives could be completed. Remember, all objectives
are required for that mode, even those that are termed optional in-game. I
also had a fourth optional objective that could be triggered later on. I
planned on getting the items for that objective on my way to the cathedral,
in case it could be finished ghost-clean. Eastern Streets I
decided to cover the east part of town first, mainly since the dispersal
concoction had to be made in the west tower, and the required items were
spread across town. Covered most of the buildings here without issues. I
entered Rothchild’s from Talford
Manor’s balcony, as the archer was very difficult to dodge coming from the
south. Not sure what was up with the thief and the unconscious guard north of
Rothchild’s. The thief stared straight into a
sealed window, and the guard didn’t make sleeping noises, but would still
wake up if alerted. Passed through Balle Estate and
reached the soap factory. Got the cray egg from
here and moved on. Only
looted the northern half of Silvershade Apartments,
as the doors connecting towards the south were pickable,
but unnecessary. I instead headed into the cathedral grounds and looted the
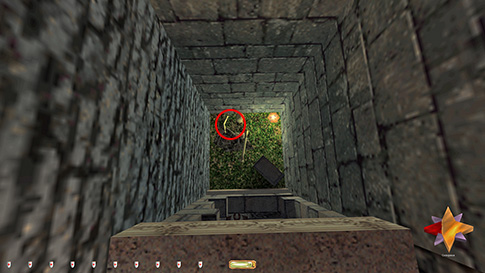
cemetery. A hidden hammer was located behind one of the mausoleums (left
image below). The intended way to get out was to ring the bell, spawning Murus who opened the door. However, he would also open
the door to two other crypts, releasing hammerite
zombie patrols (right image below). This eventually ended up in a fight between
one of the zombies and a thief that occasionally appeared from the crypt
double doors. Since the scenario was instigated by me, I felt this wasn’t in
the spirit of Supreme. However, I eventually found I could mantle back onto
the mausoleum roof without ever summoning Murus. I
just had to stand on top of the skull and leap a bit towards the right. Not
sure if this was deliberate or not.
Cathedral Went
up to get the ruby objective and the reliquary key. Decided to go ahead and
loot most of the cathedral while I was here. It felt more logical to get the
potion recipe before starting to gather the ingredients also. I didn’t need
to turn off the reliquary cameras. I could monitor the nearest camera from
the library doorway (left image below). I had to unlock the door, then run
back to the doorway; otherwise I got caught. The cameras just stopped if
spotting me, but didn’t utter a sound. I thus had to make sure they continued
pivoting until I was fully out of view. The pilgrimage maps in the study
required good timing of the two hammerites. The
priest made three stops. When in the northeast corner of the room, I was safe
to go in. Upon entry, the best method was to mantle up the nearest bookshelf
as soon as possible (right image below). From here I could grab the
candlestick and better time my descent and exit. Downstairs I cleaned the
main library and Devan’s office. I really liked how
I could use the bookshelf ladders to reach the upper walkway.
One
problematic loot item was a holy hammer behind a banner in the northwest
corner of the compound, just above the staircase to the aforementioned
office. The intended technique was to slash the banner, which of course is
disallowed for all Ghost modes. Even then it was difficult to reach. I had to
jump from the upper railing and land in a mantle to get to it. When trying
this method again, I realized you can also grab the hammer through the banner, without ever
slashing it! This was impossible to do from above without taking damage,
however, so I’d have to think of something else. There were no rope
attachable surfaces nearby. Neither were there anywhere to land directly in a
mantle, breaking the fall. The only option would be a stack. A hammerite guard patrolled nearby, but not exactly where the stack would have to
be. In addition, I would probably be able to make the stack, grab the hammer,
and retrieve the items in between his rounds, which made it even less rule
violating. After some experimentation with one of the saves from my blackjack
run, I discovered I needed 6 potions to successfully reach the hammer. Of
course, all those items would also have to be returned for Supreme. I was
making another trip through town anyway, so I would pick up what I could
then. Interesting problem this. It had been a good while since my last proper
stack, and this solution really excited me. More on this later. While
I was in the library, I opened the door in the southwest corner to trigger
the hammerite-novice conversation in the courtyard.
This was important, since when I’d approach the cathedral from the west
later, they would actually first alert to the nearby door opening. They
wouldn’t actually give a verbal remark since their conversation triggered,
but they would be in a first alert state and give settling remarks later.
This meant there were now two extra patrollers, but that I would simply have
to deal with. Back Through Town Returned
to Balle’s and skipped west to Maximillian
Estate. Had to use one of the two northernmost statues, otherwise the thief
on the balcony further south commented (left image below). Once I was on the
statues along the wall, I was hidden by hardcover. Cleaned this house and the
southern of the Silvershade apartments easily.
Looted
my way southwest. Grabbed a tough to reach candlestick on the upper sill of a
wooden ledge here, before entering this house through a window on the lower
level (right image above). Clever design in this part of town; probably my
favorite so far. This was sort of the central hub of the city, with multiple
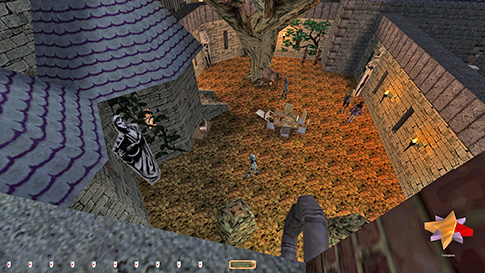
paths in all directions. I needed the magma crystal from Al’Darude’s
estate, but I couldn’t drop into the courtyard coming from the east (left
image below). Even if I had been able to, getting into the actual building
was equally impossible for Supreme. Unfortunately, this meant the wine bottle
on the table and the green vase from the courtyard apartment had to be
skipped for that mode. For regular Ghost I could take them, but it was quite
tough without dousing any torches. I had to use the shadow cast by the
staircase and approach the stationary guests from the side. There were four
mages in this area also.
What
this meant was I had to move south and instead wrap around through Fort
Romero, then plan to approach Al’Darude’s from the
west. This strategy quickly fell to pieces, however, when I realized I couldn’t
leave through the window of Knobb & Job (right
image above). The balcony was simply too lit-up, and the patrolling archer
always caught me. If he had stopped during his patrol, then I might have been
able to reach the smuggler’s hideout in the southwest, but it was not to be.
Thus, I was forced back to the central hub and this time wrap around to the
north, through Butcher Bill’s. From
here I could approach the warehouses via the balcony to the north. There was
a lone, stationary archer on the western plateau that was just plain
frustrating. It took a long time for me to realize he occasionally pivoted
northwest (left image below). It seemed, however, that he only first alerted
in this position. Facing northeast he never said anything. He only stayed in
the northwest position for about 10-15 seconds though, so most of the time he
didn’t alert at all. Knowing this, I found I couldn’t reach the loot on the
table without a first alert. Although taking it without any utterances was
possible, it didn’t feel right knowing that something was wrong with his
voice cues. It was only worth 10 gold combined anyhow.
The
entire warehouse district was fairly straight forward. I could now get the
magma crystal at Al’Darude’s without ever needing
to enter the courtyard. I gave it a real shot trying to leave the doorway and
get down the stairs into the shade for Supreme, but the male guest (marbleman, or Andy J) always commented. He did have a conversation with
the female guest, but there was no time to get the vase from the nearby
bedroom and get back inside before the conversation ended. There was just too
much activity with the patrolling mages around. The bottle on the table was
even worse, as the stationary mages further west also commented. The
balcony outside Knobb & Hob could now be
reached from the ladder in the northwest corner (right image above). This was
dark and I could sneak a bit further east and approach the gambling table
directly from the north. Could take all the loot without problems like this.
The smuggler objective nearby posed no issues. Headed back through the
northern warehouse and approached the northwestern part of town.
This
was the easiest portion of the city. Quite the contrast to the heavily patrolled
central hub. Luckily, making the monker mash didn’t
actually make any sound, though it sounded like it would alert the whole
neighborhood. The building northeast of Tuttleshank
had two apartments, both with pickable entry doors.
I actually managed to avoid picking either of them. After getting the purse
from the guard, I headed back to the wizard’s tower and jumped out of the
northeast window. Then I could access the eastern apartment and use the
secret vent to get to the western one (left image above). There was a small
patch of shadow behind a wall outcropping in this apartment that kept me
hidden from the tenant. Finally
headed to the cathedral to get the remaining loot. I managed to reach the
holy hammer behind the banner using 3 holy water vials, 1 fruit, 1 healing
potion and 1 speed potion (right image above). There was plenty of time
before the hammerite patroller returned. Awesome!
Got the hellfire ruby from the belltower next.
Although shooting the bucket with a holy water arrow killed the demon, it was
clearly a scripted event. No kill or damage showed up in the stats, the demon
never alerted to me like a normal enemy, plus I only ever interacted with the
bucket. Additionally, if I didn’t use a holy water arrow, I automatically
failed the objective. I think most players would say this is ok. If you feel
it isn’t, then it is no problem to skip this objective and never bother with
any of the required items. That would certainly make your trip through the
city a lot easier. I even checked with the mission creators and got a
confirmation that the demon isn’t technically killed, which confirms my
previous assessment. Took
the east route back home, dropping off the 5 remaining items used in my stack
along the way. The last item was the holy water vial that I used in the belltower. This is definitely up there among the very
best thieves’ highway missions I have ever played. Thank you Random Taffer and marbleman! Statistics: Time: 2:54:10 Loot: 5938 out of 5938 (Supreme: 5853) Pickpockets: 8 out of 8 Secrets: 12 out of 12 Locks Picked: 9 Damage Dealt: 0 Damage Taken: 0 Consumables: 1 Holy Water Vial, 1 Water Arrow Ghost: Success! Perfect Thief: Success! Supreme Thief: Success! Perfect Supreme Thief: Failed! Notes: -
Had to skip a wine bottle worth 25 and a vase worth
another 50 in Al’Darude’s courtyard and adjacent
apartment for Supreme. It was impossible to get into the courtyard without
first alerts from at least one of the guests. -
Had to skip the coins worth 10 on the balcony north of
the warehouses for Supreme. The balcony archer pivoted too frequently for me
to grab them unseen. -
I didn’t count “killing” the demon a Ghost bust. It is
a scripted event, part of a puzzle, and no damage or kill count shows up in
the stats. |
|
|