|
PREVIOUS MISSION THIEF GOLD NEXT MISSION Mission 5: Thieves’
Guild [This
walkthrough has recently been updated for TFix,
running NewDark 1.25. Although the original text
for OldDark has been preserved, situations affected
by these patches have been inserted in green. All screenshots have been
updated, and many new ones have been added. Keep in mind that there is a
difference between playing the game in NewDark with
or without TFix. TFix
updates the core mission files, as well as applies .dml
files that tweak the environment in numerous ways. These changes aren’t
supposed to have a significant impact on gameplay, but when ghosting, slight
changes could occur. If wanting as close to the “vanilla” experience as
possible, install just NewDark, without any further
patches. I have ghosted the game 1) in OldDark, 2)
in plain NewDark, and 3) in NewDark
with TFix. This walkthrough will discuss
differences between all varieties.] I gotta laugh! This mission is so big and confusing I still don’t know if I’ve got it all covered. Drawing maps turned out to be more painful than entertaining. On the other hand, it’s well constructed with lots of hidden loot and secret places. There are some quite funny dialogues worth catching that fit nicely in with the storyline. All in all ‘Thieves’ Guild’ is good enough to avoid being boring, but the quality is far below missions like ‘Cragscleft’ or ‘Bonehoard’, certainly in terms of architectural style or pure atmosphere. For those of you up for a challenge try ghosting this mission; it’s a handful! Overall score:
7.7/10 Forget about Supreme, it’s not possible at all! At
best I’ll go for Perfect Thief. Will also try to get all items and
pickpockets for Norwegian Thief. I’ll attempt to keep 1st alerts and
consumables to a minimum too. My main objective is to break into the Thieves’
Guild via the gambling den. The Overlord’s Fancy supposedly has a secret
entrance to the guild. Thereafter my target is Lord Randall’s sapphire vase
and his prized bracelet. They’re probably concealed well out of sight.
Additional goals are 2,000 in loot and getting back out to the streets.
Sounds like a challenge, so let’s go! Ghosting rules do in fact allow buying equipment
from the purchase screen. I could use some extra moss arrows and maybe a rope
arrow, but I’ll skip that risky trip to the armsdealer.
A speed potion or two could also come in handy, but ‘Chemical Ghost’ just
doesn’t sound that respectable. I’m bound to find something useful along the
way anyhow, so I’ll start with what I have. Plus it’s a Supreme bust and I’ll
make an effort to minimize them.
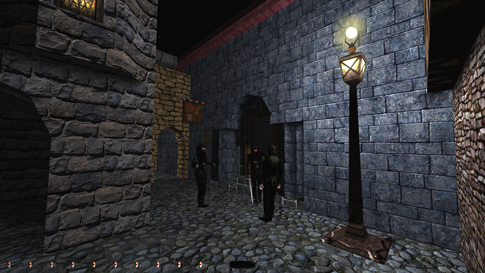
I begin in the streets outside the restaurant. Peeking
around the corner reveals two individuals pleading access to the place (left
image above). Now here’s a thief well worth fearing: Sutter, the born
guardian! When they finally gain entrance, that’s when I sneak up and stick
my foot in the door before it closes. A note on the outside wall tells about
a back door used for deliveries. I slip inside, close the door and find a
nice comfy spot to the left. Sutter resumes his duty patrol, which follows a
counter-clockwise pattern between here and the kitchen to the east. Both the
servant and the other thief exit through the open doorway up ahead (they end
up on the second floor and in the gambling den respectively, also resuming
their patrol patterns). Yet another thief guard patrols a very short route to
the front. I try to sneak over past the fireplace while both thieves are not
looking. Aah, there’s a female cook in the kitchen
also. She certainly caused enough commotion when I traversed across the room
in bright light. She’s easy to avoid though, I’ll just have to creep-crouch a
bit further to the west, out of her sight. This
entire room is much more difficult to pass if using TFix.
The ceiling candles’ illuminations extend much farther than in the original.
I can still pass the woman’s gaze without alerts though, but not without
slowly hugging the walls to the west and timing the guards to perfection. In NewDark without TFix, it works
like in OldDark. I continue south and slip
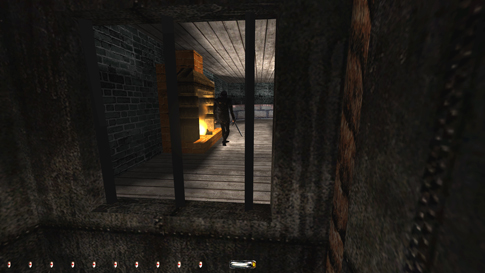
through the door. Quickly up on the bench and through the food-slot. From
here I can spy on the thief (right image above), and when he turns, I rush in
to grab the two stacks of copper coins (10), the restaurant key and the stack of silver coins (25) from the
box on the table (right image above). The door in here is locked and unpickable. Probably access to the den, so I’ll either
have to find the key or some other way down. I’m done on this floor so I’ll
head upstairs. The kitchen may contain some food in
need for grabbing though. Yep, a piece of bread and some meat on the bench next
to the lady. However, it seems impossible to reach them approaching from the
west side. The note outside spoke about a back door, perhaps I could access
the kitchen from the opposite side. I return to the front door exactly the
way I came. My restaurant key unlocks it and allows me to sneak out without
notice. I am careful not to open the door when the swordsman outside patrols
there. If the thieves inside see him, it will cause a large fight. I head out
and follow the streets east and end up at the door in the south. The key fits
perfectly! In I go and lock the door. The loaf just right of the
doorway to the kitchen is easy enough to grab. But the piece of meat will
need some clever thinking. Sutter passes through this room with fairly close
intervals, so I’ll have to be swift. When he heads out the exit, I hop onto
the bench to the left. Then cc over and lean to snatch the deer leg.
There! One more dinner secured! Rapidly back down and out through the open
doorway (left image below). Phew! I make my way back out to the city and
onwards to the front door. Inside and all the way back to the west side of
the food-slot. I
unlock the only door in this hall and sprint up the stairs.
Another servant patrols here, this time in a
clockwise route (the guy who entered the building at start). When he passes, I
follow him through the next door into the larger bedroom. Two chests, a crate
and a sleeping guard. The first chest contains a rope
arrow. The second chest is locked but pickable.
It holds a stack of gold coins (50) worth 25. I walk gently over to
the next door and ease through. Directly to the
right in a dark cranny are two broadhead arrows.
I find myself in a room full of barrels and what appears to be a chute
down to a lower level. I seem to remember spotting a shaft like this in the
kitchen, but steel bars secured the opening. A rope arrow in the wooden
ceiling would definitely do the trick. I grab hold of it and lower myself
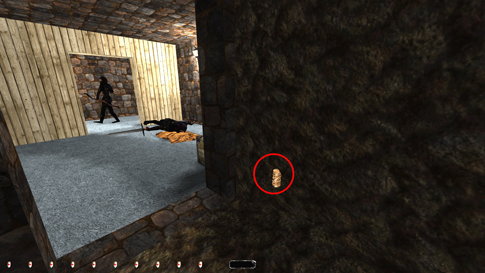
down. Wow, I got caught descending the ladder by the maid in the kitchen! A
full alert also! Reload. I make sure to place the arrow far to the left
(east) this time, to avoid her view (right image above). Got it! Alright! Now we’re talking! Looting a casino...if
my mother could see me now! I’ll scope around to check the territory first.
... ... Ok. The den seems to be divided into four similar areas, with a total
of 5 stationary thieves (2 of which are archers), 4 gamblers, and one
patrolling rogue in the middle. Each section contains loot and/or other
goodies, so I’ll go step by step. NE: I sneak to the north and crawl straight through the doorways ahead. A thief patrols circularly in the middle section, overlooking all four parts, so I’ll watch out for him regularly. Directly to the left is a darkened patch. From here I snag the two water arrows from the railing to the west. There’s a window in the opposite corner where I can access loot and a pickpocket from the NW section. Sneaking along the northern wall (over the roulette table) alerts the male servant facing my way. I’ll try to sneak from the south then. The thief now gets alerted, but only with a “what’s going on”-mumble. Getting onto the window edge also proves more difficult than expected. A crate might help... There was one in the restaurant bedroom I recall. I climb back up and fetch it. First I place the crate out of sight from the thief (in front of the southern end of the window), and hop on top of it. Remember; when using boxes I always apply the technique of dropping it straight down, then immediately pressing the jump-button. This causes me to land on top of the wooden crate without making any noise. Standing on the box, I slide down and land on the floor almost directly beside the thief (still on the east side of the window), but this time without any kind of alert. Guess this new height hid me a little. I pick up the crate once more and leap up on it. I can then cc into the left corner of the windowsill. With TFix,, crates can’t be used this close to enemies, as they make more noise than in the original Thief Gold. However, I don’t need a crate at all using TFix (not in the entire mission, as it happens), as the thief no longer first alerts to me emerging outside the window from the south. With new_mantle enabled, I can also mantle into the windowsill safely, as long as I do it in the southern end, out of view of the gambler outside the northern window. There is a perfect angle to mantle where I end up in the dark patch shown below to the left. In plain NewDark, without TFix, everything works like it does in OldDark; the crate is then needed to avoid any first alerts. One tiny spot turns me completely dark, and the trick is to find that exact space without getting seen. I’m well within reach of the casino key [1] worn by the guard here. One piece of loot is situated on the top shelf on the back wall. Releasing the crouch-key makes me able to lean far enough forward to get completely inside the room and grab the purse (100, left image below). That’s all from this side of the window. The crate must be placed fairly far to the south for me to sneak back onto it and drop down without getting caught. Home free!
NW: Believe it or not, rushing out the doorway to the northwestern area only alerts the people in here to a 1st alert. If I run at an angle and come to a complete halt in a crouching position, every AI will finally blame the rats. After they all settle down, I can start to move again. Very important to creep-crouch every inch of the way now! A minor speed enhancement will arouse the party to an angry Garrett-hunt. Keeping as much distance to the servants as possible, I can lean over and snatch the two stacks of copper coins (110, right image above). Strange how I can fool these guys in such bright light, grabbing their money from right under their noses. Those keepers sure taught me well! Back out the doorway the same way I entered. The section above works slightly differently in NewDark. First, the closest gambler now correctly faces the table, or north. This means he’s out of the picture in terms of alerts. Second, I can actually mantle over the counter directly south from the left end of the table without taking any first alerts (left image below). There is a tiny area where none of the guards seem to spot me. Inching forward I turn dark, from where I can drop onto the carpet Supreme clean. In NewDark without TFix, I get spotted a few feet away from the table and can’t reach any of the loot. With TFix however, I can sneak over towards the leftmost gambler much farther than before. There is a sweet spot where I can stay out of the view of the torch to the east, while still keeping the light gem from being affected by the window lantern. At this point, even the slightest of flicker in the light gem, and the gambler comments. Now I can tap the lean forward key to reach the coins. A full lean will spawn alerts, but with a half-lean, just enough to highlight the coins, it is possible to steal them without a Supreme bust. Replaying this area in OldDark made me realize I was never able to grab the coin stacks without further alerts, as I claimed I had years ago. Instead, the gamblers and thief were in a constant first alert state from me entering the doorway. With TFix, with some luck you can even rush back out the east doorway without first alerts. This therefore improves my Supreme run by 10 gold worth of loot so far, if playing with the TFix patch.
SE: This is the easiest part. I enter the doorway opposite from the fireplace, and walk over to the darker part in front of the table up ahead. Both stacks of copper coins (120) are reachable without a 1st alert from the guy through the window. I simply inch forward and bend over until I can barely grasp the one furthest away (right image above). The other table in here holds more loot, but I need to approach it from the doorway in the southern wall. This means I have to exit, make a right and enter the door at the end. The guard turns facing the table every few seconds, so I have to check his orientation before leaning over to collect the stack of silver coins (132). To pluck his casino key [2] I have to open the metal door to his chamber and sneak quickly in to filch it when he stares out the northern window. With that, I return to the eastern end of the thief’s patrol route. SW: To get all objects I need to bring the crate with me a bit further. I follow the patrolling thief’s route in a crouching position. Two servants gambling at a nearby table starts a conversation. Irrelevant, but quite hilarious. When he turns at the corner, I halt and draw a water arrow. Dousing the torch on the wall here is necessary to enter this gambling area. The servants notice the douse and mumble that something might be up, but soon settle. My first required Supreme bust. I stand up and mantle onto the railing. I drop onto the carpet on the other side. Three stacks of copper coins (147) and a stack of gold coins (172) are easily accessible on the table, without any fear of getting spotted (left image below). The two guards inside the smaller chamber to the south have keys to pick, but they are impossible to attain from here. I’ll have to filch them coming through the gate on the back wall a bit later. An electric light flickers on and off to my right, and I can move quickly around the corner timing the glow.
NW: Sneaking along the western wall I can eventually grab
the stack of silver coins (184) on the gambling table unnoticed. I continue to creep eastward down the wall toward the
window. Before reaching it, I look south to watch the patrolling guard. I’m
quite brightly lit and will be seen if he comes by at this time. Drop the
crate here by the window and crawl up onto the windowsill like I did at the
other side. To avoid the thief’s regular patrol I slip down inside the
chamber and block his view with the window-corner. From here I can reach all
items of value: a healing potion and 2 water arrows from the shelves, and another casino key [3] from the archer’s belt
(right image above). I then have to grab the crate from the inside and use it
to get back out again. I won’t let the crate stay down here, so I bring it
with me. I then crawl back to the NW corner. Hey! This roulette is frobbable! Let’s try
it. Oh, it triggered a secret entrance behind me. I quickly slip in before it
closes.
I can let
the crate lie here for now. Sliding down the
slope I approach the basement. I spot two guards through a hole up ahead
(left image above). Apparently, Randall’s vase is locked up in Donal’s lair, while Reuben has the key to access it. I’ll
head for Reuben’s first then. They both start patrolling. One enters the door
ahead and walks in a bit before turning and heading down south. I find two moss arrows sitting on a shelf to the
right. I sneak out and head up the slope. At the top I turn right and
find a nice comfy patch on the left side of the doorway. This area has two
more patrolling guards, a swordsman carrying a potion, and an archer. The
swordsman will pass me here, and when he does I grab
his healing potion [4] and head north. I
slip down the next hall to the left, and make a right through a door. This
room controls doors, gates and lights around the sewer compound. There are a
total of 9 levers here. Three levers are assigned to area 13, three for area
14, while the last three have no assigned number. The machines on the
opposite side are assigned with number 12. I wonder if this was a mistake and
the three unassigned levers are supposed to have 12 on them, or if area 14 in
fact has six levers. Anyway, I have been able to find the use for some of
these and have made a list. Area 13) Left lever: Opens the closest gate down the hall. Middle
lever: Opens the second gate down
the hall. Right
lever: Opens the metal door on the
south side of the hall Area 14) Left lever: Controls the lamp on the southern
wall of the walkway overlooking the grassy area. Middle
lever: Controls the lamp on the
northern wall of the walkway overlooking the grassy area. Right
lever: No function. Unknown area) Left lever: No function. Middle
lever: No function. Right
lever: No function. I pull
the right lever for area 13 and slip back out. The guy I snagged the potion
from earlier patrols down this hall also. I watch out for him before entering
the now open metal door. I make a hard right and ascend the slope to the top.
Waiting in the shade for an archer to pass me, I familiarize myself with this
new area. Lots of light, that’s for sure. The only things of interest are two
water arrows and a rope arrow. The two water arrows are easy to grab
as they lie on the wooden railing behind and to the right of the archer
overlooking the area further below. The rope arrow on the other hand lies on
the dark ground directly underneath the archer. Another swordsman covers the
grassy ground down below, so entering through the large metal swinging doors
would be impossible. I could extinguish all the torches here, but using six
water arrows to obtain a single rope arrow seem a bit out of place for a
thief like Garrett. I cannot drop down on either side of the stationary
archer without getting busted. I can see one solution, but it’s a tricky one.
Nudging the stationary arrow-guard forward until he drops down to the lower
area might bring him forward enough for me to access the ground area
unnoticed. But to get back up I’ll have to use a rope arrow. That would be
tough to do from down there so I’ll fasten an arrow to the railing up here
from the walkway. There! Fastened without any comments! Now I follow the
walking archer back (grabbing the water arrows on the way) and slip down
behind the wooden ramp into darkness. From here I can sneak out and push the
archer each time the other guard walks off south. It’s time consuming, but
could be worth it. OK! Have pushed him down to the lowest plane (right image
above) and can just hop down on the left side without any alerts. Not
forgetting what I came down here for I grab the rope arrow. Hey!! My
inventory says I’ve only got one rope arrow?! Didn’t I start out with two,
then found one more in the restaurant, used one to access the casino then
used one more on the railing here? That should leave me with two such arrows,
including the one I found here in the dirt. What if I shoot off the one I
have before grabbing this one. Hah!! Taking this arrow now only states ‘Rope
Arrow’ in my inventory, with no number next to it at all! Grabbing the other
two arrows now doesn’t add any to my arrow value! This bug provides me with
an unlimited amount of arrows for later use. This has to be a bug, so I won’t
make use of it. Back up the rope arrow and grab it as I mantle up onto the
wooden overlook once again (left image below). The metal door in the NW
corner leads to Donal’s mansion, but it is unpickable and the key finds itself on the other side of
the door. With this, I make my way back to the lever operating the metal door.
I frob it and leave closing the wooden door. I continue north following the patrolling archer in this
area. There’s another wooden door here leading to a tiny hallway and the exit
from the middle sewer into the north basement.
Easier area this. A servant roams between the two bedrooms to the right. He only just enters the closest, so I can effortlessly sneak in and hide in the northeast corner. A mine rests here beside the foot end of the bed. I follow the guy out the doorway and enter the next bedroom to the west. Here a golden goblet (209) is fairly well hidden on a shelf far up in a corner (right image above). I grab it and sprint out through the other bedroom. Straight forward is another larger room with a couple of chests. The rightmost holds two moss arrows. Also, behind the partly fallen statue lies a new deer leg. Approaching the area further to the east triggers a conversation between two guards. They talk about my score at Ramirez’. I follow them as they walk onwards to the north. Both guys enter wooden doors. The left one arrives in the guards’ quarters. Over on the left wall are two doors. I enter the second one and hide in the doorway, oddly this keeps me completely hidden. The guard in here walks to and fro, left and right. When he heads left, I can sprint out and pick the lock on the chest to the front. It holds a silver nugget (259) worth fifty. Doing the same with the closest chest gives me another mine. The next time he walks south, I sneak the other way and hide in darkness squeezing to the wooden door (left image below). Opening the next door presents me with another challenge. An archer walks back and forth in a very brightly lit room. I can put out the two torches, but let’s try a different move. I notice he always turns towards the southern wall, that is, with his face turned away. Can I actually follow him and when he turns, open the door and leap through without any notice? Oh yes I can! I get a mumble from the lady in the next room though, but that beats dousing any light. Further I can creep-crouch behind her to snag her precious purse (289) [5] (right image below). Picking the westernmost chest provides me with another grumble and a healing potion. The other chest contains a single flash bomb. I then make my way back to where the two talking guards split up, and I follow the other guy’s route into some kind of a storeroom. Among the various shelves I find a golden candlestick (339) and a necklace (389). Another wooden door to the east leads to the next section.
I follow the only path possible, turning right at every junction. I emerge from the sewer tunnels through a swinging metal gateway. Up the top of a sloped hall I hear footsteps. A swordsman appears from a door to my left. He walks north, then turns and strolls into a hallway east. I sprint forward and enter the second door on the western wall. A cozy room with some guy facing a bookshelf next to a fireplace. I swift through the papyrus on the table to the front. It’s a letter from Reuben to Thom (this guy) saying that he entrusts him with the only key to his proper. Aha! This must mean the key is in here somewhere... But where?! A stack of gold coins (414) by one of the table legs catches my attention first. Sneaking around the desk to the left of Thom I notice some sort of a panel in the side of the fireplace. I can lean over and open it. YES! Lord Randall’s bracelet (489)!! That was some well-hidden loot, but I got an unavoidable murmur from Thom. And from here I can spot the key in a small nook in the bookshelf. But Thom would surely spot me grabbing it. What to do...? Putting out the fire makes it somewhat darker, but is it enough? I can see two ways past this problem. Ghost rules allow nudging and I can apply that technique on Thom here. Pushing him forward into the space between the bed and the shelf allows me to take the house key without trouble (left image below). But nudging is only allowed as a last resort, and there is another way to obtain that key. After dousing the flames I can jump onto the bed, only receiving a 1st alert. Might I avoid that alert if stacking objects to enter the bed? Yes, one alert avoided! I squeeze against the wall and drop to the floor next to the bookshelf. I can then lean over and grab the key. I use the same way to head back across the bed (right image below). I use the crate from the storeroom in the north basement for stacking, but you can obviously use other items if having them. One loaf and two deer legs is easier if having taken them earlier. It all depends on your priorities which method one uses to attain the key.
I have never been able to replicate the crate-technique and eliminate the first alert to get onto Thom’s bed, neither in NewDark nor OldDark. I suspect I was never aware that Thom was already in a first alert state from dousing the torch, and then assumed he didn’t alert. Back in the hallway I take the narrow path east. A swordsman makes his cycle around a water pit. A stationary archer guards a metal door to the north. Fairly lit up all around the pit. Sneaking left is out of the question, at least without dousing the two torches in front of the archer. I hear a comment from him sneaking right, but he stays put for now. I walk around the corner to the next patch of shadow. Arriving at the east side of the ditch, I spot the archer yet again. The picture below to the left shows the farthest I can go without a Supreme bust. From this point I can run past the bright field and only get a first alert complaint. I sneak further into the dark area to the side of him and wait for the patrolling thief to come by. With TFix, coming from the ramped hallway rounding the corner to go south around the ditch, I no longer get a first alert from the archer. For some reason, the lights don’t illuminate as strongly as they used to. However, I still get the first alert sneaking along the east wall. When he’s gone, I can slowly crawl in behind the sentry and unlock the door with my house key.
I can open the door and peek into the next room all covered in darkness. Two servants meander around here and I have to watch them carefully to avoid any alerts (right image above). This would be a good time to look at the map. I have pointed out two locations where Garrett will be somewhat safe from their patrols. The yellow dot is the first place to hide. If waiting here for one of the servants to wander off east, I can slip out the doorway and head west myself. I can then head into the first cell on my left like the green dot signifies. In here I’m completely safe. The next trick is to sneak out the door in the NE corner. Timing both servants’ routes and the green spider’s circular pattern in the next cell, I can head for the stairs unnoticed. In the room out the north doorway I find another mine. That’s all down here so I head upstairs. --- Reuben’s Mansion, 1st Floor --- Upstairs I immediately hear footsteps. I wait in the shadows here and see two swordsmen with fairly close intervals enter this room and turn right before the fireplace. When they’re gone, I head into the two small rooms west and northwest of the fire and find a stack of copper coins (494) and a golden goblet (519) respectively. I wait in the shadows now for the swordsmen to return. When they leave I follow the last one into the kitchen. Hrmf...marbled floor, and a lady cook is stationed here also. I quickly creep forward and look around. I find a water arrow on the stove ledge. That’s all so I crawl back out to the small shadowed area just outside the kitchen entrance. Once again I wait for the men to come by on their patrol (left image below). Swiftly now I sneak north. Another archer guard patrols back and forth in an east-west direction here. He should be coming from the west just about now. I hug the left wall and when he passes I sneak west and start picking the door to the right. It’s a hard lock to pick and requires switching lockpicks, but I can just get it open before any of the guards return. Get inside and slam the door. Phew! That’s ghosting!! On the north ledge lie two more water arrows. This room is basically just for waiting on the guards once more.
I open the door and peep out. I most probably won’t get caught if stationed a bit to the right. Luckily the archer is heading left with the last patrolling swordsman right behind. I sprint out, close the door and rush north to the end of the hall. With a bit of luck the woman in the kitchen will say something like “Is anyone there?” and that only qualifies as a first alert. Quickly I draw my triangle-toothed lockpick and start working on this silver-colored door. Again I’ll have to change tool halfway through the process. The archer appears in the distance to the right. Picking some more...nearly there...UNLOCKED! I haste inside, spawning one more comment from the lady. On the wooden ledge I find a valuable diamond (599) and a fire arrow. Opening the door again I wait for the archer to turn. When he does I run out and to the left. Sometimes the lady catches me, either because she’s tired of blaming her imagination, or because I’m too visible. However, I turn around once out of her view and close the door, then follow the arrow guy into the larger hall and enter the door on the left. Safe! This last part was a very tedious maneuver and could be painfully difficult to accomplish, but I assure you, it has been repeated and only requires fast work and some luck. It would be easier to use a couple of water arrows to douse the light in the hall, but as mentioned I try to keep consumables at the lowest possible level. As you can see from the image above to the right, I have obtained the diamond without dousing any lights. I find myself inside a bedroom. Nothing interesting here, but the toilet hides a box concealing a tiara (659). Timing the guards I head out and enter the door directly to my left. The archer patrols a short distance into this room, but he’s fairly easy to evade. A stack of silver coins (671) inside a locked chest and two stacks of copper coins (681) are all the loot here. I exit through the only other door. I follow yet another door out into a small passage connected to where the swordsmen walk. A doorway to the south leads me to a dining area. I take the southeastern door into a huge empty room, and further south to an outside area. Snoring nearby. Two more doors take me back inside, I choose the eastern one. Two guards have a long route just inside this door. I wait here for both of them to appear out the wooden door on the right wall. The second carries a healing potion [6] for me to pick. I now have about 2 min 20 sec for them to return so I’m in no danger. Also inside this gambling room are two mines, one on a small desk and the other under the regular table. I then follow the thieves into another bathroom. In the tub is a water arrow. Continue out the right door. Lots of loot! A vase (706), two goblets (726) and a bottle of fine wine (776) worth 105 altogether. Out the other door I enter a marble-floored room. The guards pass this room twice in their patrols, but they should still be far away, so I steal the golden candlestick (826) from the table while I’m here. I creep over through the southwest door, and open yet another door on my right. I walk towards the ramp up ahead, but before venturing upstairs I grab a golden candlestick (876) on a wooden table to the left.
--- Reuben’s Mansion, 2nd Floor --- Among the bookshelves I find a papyrus. It informs me that Donal’s safe key is hidden behind a secret panel in Reuben’s room. Having served its purpose I drop the paper back. Through the left door I discover two sleeping blokes. The two pickable chests contain a healing potion and a flash bomb. There’s also a mine on the floor. To the north is another door, I walk through it. A total of three guards patrol up here; two swordsmen and a single archer. The archer I see now. Not long after, the two other guys walk by at the opposite side of the walkway. When the last of them goes north I start moving following the archer. He carries a healing potion that I pilfer along the way. When he turns west I rush in the door to the front and quickly close it. I grab the vase (901) on the desk here and continue north into a new bedroom. Swiftly over to the NW corner and wait. The two swordsmen will come through here and they’re both unable to see me. I can snatch both their keys [7 & 8] from here. To be as Supreme as possible I don’t have to empty any of their pockets, but it requires some very tricky maneuvering. First I grab the goblet (916) on the table. I then wait until the second guard walks by outside the west door. I open up and follow him through the double doors across the hall. I keep as close to him as possible now, and then just as he turns to his right, I rush into the SW corner. The guard I followed will continue north while the other will appear through the closest door and walk by without seeing me (left image above). This takes a bit of timing to get right and don’t be surprised if you can’t make it on the first couple of tries. (These thieves might have patrols that are closer together or farther apart, either of which will change the required approach. I have even seen one of the doors in the gambling room remain unlocked, which renders this situation a lot easier if wanting to avoid pickpockets.) I keep on following the first guard while the second leaves the room through the double doors. I can then frob the next door before it closes. Quickly grab the two golden goblets (966) on the desk and make my way safely inside the bathroom. I now have about 1 min 20 sec until the first guy appears again, so I move fast. I grab the bottle of fine wine (1016) next to the tub, then rush into Reuben’s private chamber. First there’s a book on one of the desks about Reuben’s various payments, with a healing potion resting next to it. On the south wall is the secret panel, well it’s not that secret...not anymore at least. I find a silver nugget (1041), a golden nugget (1101), the safe key inside a box (right image above), and a note that explains just how much Reuben really hates Lord Donal. I close the box and the panel, and return to the shadows next to the west door. Here I wait patiently for the second guard to come. When he comes by and leaves, I slip out just the way I came in by stopping the locked door before it closes. I follow the guys back, past the archer and into the bedroom with Sleepy and Zzznory. The west staircase leads to the bedroom downstairs next to the kitchen. I close it frobbing the lever from the outside. I then take the long journey back to the middle sewer where I eavesdropped on the two guards talking about where Donal’s safe key was, the one I just took. I bring back the crate I used at Thom’s to the storeroom in the north basement also. It’s a bit delicate to get it back in place. I have to drop a loaf down first to get the right height, then push it onto the shelf. --- Middle Sewer 2 --- From the door leading to the grassy cellar, I go directly south into a dark cranny. I wait for the men to come by and snatch the purse (1111) from one of them. Thereafter I head west and pick up the flash bomb and the mine in the next section. Exit out the hall to the SE and take the next long passage south again.
I sneak directly right, past the slope to the left and hide around the next corner. I can see a stationary guard at the far end of this room; he’s facing the south wall. Soon after, a lady enters from the east. She turns around and leaves the same way. I walk over and hide in the shadows behind the pillar at the opposite side. A purse (1131) rests beside the guard worth 20 gold. Nothing else in here except for some crates. I return to the shadows by the exit. East again past the passage to the right and head for the doorway in the SE corner. More levers, six more to be exact. I notice a closed metal gate to the south. The first #37 lever operates this gate (the fourth lever from the left). The second switches on and off the light beyond the gate. The far right lever is unidentified as of yet. I pull the gate lever and traverse around the corner south, down a bit and into the small chamber. Two stacks of silver coins (1151) and a single fire arrow are my reward (left image above). Back out and close the gate by frobbing the lever once again. The far left lever operates the swinging gate out in the hall just west. I pull it. The next lever operates another such gate beyond the one I just opened, allowing access to the south basement, but I’ll enter that area using a different entrance. The third lever has an unknown function, perhaps a light switch? I would really appreciate thoughts regarding any of these mysterious levers, especially the ones west in the middle sewer... Okay, I go west through the hallway and enter the hole to the south. Someone is patrolling upstairs, but whoever it is seems to be out of my view. A ladder leads up there from this area, but I ignore it and head into the next grassy room to the southeast. Entering the inner cave system of the sewers now. A commonly missed mine lies on the floor directly beneath a metal grate in the ceiling. Out the dark opening further east. Another large metal door to the left (access to the basement as mentioned). I walk right and stop at the next junction. These tunnels are the home of two nasty creatures, two small spiders. They patrol along the path I just walked and will be heading this way. Most often, only one of them makes it this far though, since they don’t seem to be the very best of friends. One normally gets killed further down to the west. If you rush down there, you can usually catch sight of their fight (right image above). Anyway, whoever wins it won’t be coming this way until you start heading down the tunnel slope. Meanwhile, I take my time to collect the diamond (1201) worth fifty and the water arrow on the ground to the left. Venturing to the northwest now, and pick up another water arrow and a moss arrow. I can hear one of the critters walking this way, so I sprint back into the shadows. He might randomly turn at various points along his route. I want to lure him all the way back to the area with the mine and the metal grate. Hiding in the southern entrance I can wait for him to pass unnoticed and head the opposite way (left image below). I run all the way west past the rotting corpse of the other spider, and exit the tunnels through a swinging sewer door.
Two guards will start talking about levers and security when entering the next area. They’ll both start patrolling fairly small routes on a walkway above. I climb the ladder to the left. I turn around and sneak along the ledge to the shadows behind the pillar. From here I can grab a moss arrow, a fire arrow and a water arrow from the window. I then hop into the water on the north side. In the water here is another water arrow. Dive down and enter the large pipe to the northwest. I follow the underwater route and emerge in a larger room with two lever consoles (right image above). Above me to the right is a walkway connected to where the two guards were chatting before. I stay out of the windows’ view and also listen for footsteps to stay hidden. Lever #47 operates a back door gate to Donal’s mansion, so I flip it. I haven’t found the number ‘48’ written on any of the walls throughout this mission, so its function is unknown to me. There’s also a barred up door here unresponsive to any of my keys or lockpicking tools. Can it even be opened? Anyhow, I head back through the water pipe. I swim onto the pipe itself and time the archer’s patrols to mantle up when it’s safe. Ducking near the window still keeps me well-hidden. I continue to cc out the east exit hugging the wall to the right. Reaching the corner I creep out trying to follow the darkness. From here I can jump onto the boards leading to the south basement. I quickly run over to the shadows at the opposite wall. This would be a good time to study the map of this place. This area is quite confusing and has a total of 9 AIs. 7 of them are patrolling, one of them is stationary and the last one is sleeping. Goodies are spread around well, so a bit of planning would help. A servant and an archer will patrol through this very room. However, the servant is involved in a conversation and won’t start walking until it has been triggered. So for now I only have to worry about the arrow guy. He spends about 80 seconds on his trip around the basement. When he passes from right to left I follow him into the next grassy turn. A servant here walks back and forth a short distance (don’t ask me why). I have just enough time to sprint in and grab the two moss arrows from the chest when she’s not looking. I then hurl back out and return to my hiding spot (where I waited for the archer). I still have time to walk north and exit into a brightly colored room. In the set of shelves on this side I find two water arrows, a broadhead arrow, a fire arrow, a noisemaker arrow and a message from Davey telling people to stay out of Reuben’s turf. On the floor beside the carpet I spot a tipped over goblet (1216). On the shelf at the other side stands another goblet (1231). I walk east into another dark cave. From here I listen to a conversation about the Donal/Reuben-fight. Both participants start walking, so I run back to the north side of the shelf. This is the servant I talked about and he has the same patrol route as the archer. When he comes by here, I lean over and grab his purse (1256) [11]. I return to where I overheard their chat. I walk forward and enter the sloped path to the left. The door here accesses the Overlord’s Fancy. I unlock it with one of my casino keys. Opening the gate spawns a 1st alert from the nearest guard, but no more than I can accept. Very important to creep-crouch here as quietly as humanly possible. I filch the swordsman’s casino key [12]. Further I sneak along the right wall over to the archer and grab his casino key [13] as well (left image below). Successful! Nice piece of playing there! Back out I go, close the gate and lock the door. South into the shadows. I make a right and continue south into this next area, looking out for the three men that can see me from here. The northwest corner has a nice dark spot where I’m completely safe from patrols. This next part is all about timing. See that banner on the south wall? Behind it lie a couple of goodies that I’ll go for. However, ghosting rules doesn’t like property damage so I’ll have to grab them “through” the banner. The servant and the archer just passed with fairly close intervals. Afterwards there is a longer wait where I only have to care about the swordsman coming from the east. He doesn’t enter this area, but he can spot me coming out a doorway turning south. The coast is clear so I head over and grab the diamond (1281) and the healing potion from the secret hole (behind the banner). Next I return to my spot in the corner. When they both pass me again I have to move fast. Quickly run south, into the west doorway and then south again. Down and to my right lie two stacks of copper coins (1291), they’re very hard to see and I spotted them by sheer coincidence (right image above). I am actually safe from both the archer and the servant who both patrol through this cave. Lean into the room and grab three moss arrows from a chest. On the table to my left lies a single cucumber that I take with me. These guys will starve for weeks! I swiftly sprint back to my dark corner.
Ok, let’s take a little break. I want to clean the room to the east for goodies also. Yet again I wait for the two patrolling dudes to come by and watch for the swordsman to exit south. The small desk directly to the left holds a speed potion. Beside a campfire I find a silver nugget (1316). Quickly I exit this area through the southeastern doorway and hide in the corner to my right. From here I can grab the swordsman’s casino key [14]. There’s another guard patrolling in and out of a room to the east. Check the map to see his walking pattern. When he rounds the pillar and makes his way south, I slip out of my hiding spot and sprint over to the fireplace. Behind it is a secret compartment concealing a valuable golden goblet (1366) worth 50. Lots of sneaking coming up... I’ll give you a moment to collect your thoughts; this last part might have gone a bit fast. First I return to the shadows. Four pieces of loot and two other goodies find itself in the bedroom to the southeast. The owner is stationed before a fireplace facing the southern wall. He’s actually the least of my problems. The guard that patrols in and out of the bedroom is another story. Since I haven’t got much time between each round, picking an object or two at a time is essential. The two pillars in the area just east make this job a lot easier though. When the guard emerges from the bedroom, I can position myself behind the closest pillar and move around it as he passes. I can apply the same technique as he enters the bedroom. Ok, let’s try. I follow the guard to the bedroom opening and filch the healing potion [15] from his belt. I duck and start to creep. It’s a tough call, but I have just enough time to reach the NW corner before the guard turns (left image below). Safe here! I can lean around the shelf and grab a goblet (1381) and a jar (1401). The stack on the table can be reached by cc-ing over when the guard is on his way around the pillars. The stack of silver coins (1416) is worth 15 gold. I’ll be partly hidden behind the side of the doorway going back beside the shelf. When the guard walks east I inch over to the opposite corner on the outside of the bedroom, that is the SE corner in the area with the pillars. He passes me and I sneak in once again, this time to reach the chest by the bed. Nearing the carpet I’ll have to creep-crouch by tapping the walk forward key. Leaning over I can get the two water arrows from the box. I then quickly have to make my way back to the corner on the outside. Only to wait for the guard to leave the bedroom one more time. This last time I run in along the north wall and grab the papyrus in the bookshelf. It tells Magrin to use the back door -47- to access Donal’s place. Nice! Move further and take Magrin’s purse (1516) [16]. Done in here finally! Quickly out again and hide around the pillar as the swordsman enters the bedroom. I leave this entire area following the swordsman through the southwest exit. He makes a left and I hide inside this next area directly to the right. I wait for him to leave and sneak up to the doorway ahead. Another swordsman will come along shortly, and when he does I pilfer the purse (1541) [17] from his pocket. Congratulations! The whole southern basement is done in terms of thieving. I just have to make my way back to the lower sewer using the same route as before. Back by the patrolling archer in the window; where I eavesdropped on the two talking about levers and security (right image below). I follow this wooden walkway over to the opposite corner, the northwestern to be exact. Continuing this walkway all the way to the end, I hop into the stone window and follow the path to a large sewer pool. Jump in and take the underground tunnel until I reach a gate. “Aha, a back door!” The very same described in the letter for Magrin. I open it and go through. Very close now!
Stop for a moment and listen to the conversation coming up. Hah! What a story!! Sutter is even more of a dumbass than I suspected! They each return to their patrols when done. Walking up the slope. Oops! Caught by a guard in a window to the left. Only a mumble, but bad enough. Reload. Going up on the right side I can reach a dark area before he sees me. Moving up onto the ledge by the right wall. Creep-crouching across the hall from here keeps me hidden. To the right I notice a metal door; unpickable (it’s the exit to the middle sewer and won’t be necessary to unlock). I continue forward past two cells to the left. Make a left at the next bend and enter the first door on my right. Safe. In here lies a golden nugget (1591) by the bed. A mine in a pickable chest also. Listening by the door I can determine when the two men walk by. I sneak out closing the door, and continue right then north. I enter the next opening to the right and make an immediate left. Quickly I unlock the door straight ahead with my tools and slip inside. Three chests in here. The leftmost one contains a speed potion. I open the door and wait for them to come by again. The servant walks faster than the swordsman, so he might overtake him a couple of times during the walkabouts. I then use the western door through a dark room and into another hallway. Pick the door to my right and enter another room. The chest in the far corner holds a necklace (1641). Back out again, through the dark room and into the doorway ahead. Moving up. In the kitchen. A maid is stationed next to a table in the middle of the room. A swordsman patrols through here every minute or so. There are two pieces of loot in the sink to the east. Nothing else of interest to pick up. I’ll have to leave through the exit in the north wall. But the torch in the room beyond will have to be doused in order to leave safely. Thwang! Doused. To avoid the man patrolling, fast movement is necessary. Close to the end of the bench behind the maid is a dark spot. I wait here for the man to come by. When he gets halfway across the room, I hop onto the bench and with some luck I can avoid any comments from the girl. Landing on the outer eave is usually quieter. From here I quickly crawl over to the corner and lean over to reach the two golden goblets (1691). The lamp hanging from the ceiling obstructs me somewhat, but inching past it I can just keep my feet in place. Going further I get an alert from the maid, but this is inevitable. As seen in the screen capture, the northeast corner actually hides me enough to let the guard pass unnoticed (left image below). In NewDark (with or without TFix), the guard first alerts the instant he walks through the door to the north, but there is plenty of time to leave the room before he gets that far. I drop down to floor level and sneak through the doorway. The room to the north contains a key and another mine. The key unlocks all of the entry doors to Donal’s compound. I follow the swordsman’s route through a dining room. In the following room a valuable jar (1741) sits on a table. I continue out the door to the west and open the double-doors directly across. A stationary guard here, carrying a purse (1791) [18]. Marbled floor, but no trouble sneaking up behind him and grabbing it. A vase (1891) worth 100 on a table also. Back outside I leap across the marbled gap between the two carpets and ascend the stairs to my left.
Two swordsmen walk around up here. Check the map for more detailed info on their routes. At the top I slip right and turn at the corner, then enter the door down the hall. One more jar (1916) worth 25 gold. Out in the hall again I enter the next door on the right side. In here lie a couple of books with info on some of Donal’s jobs and errands. Another one of those keys I found downstairs lies on the desk also. One of the guards will enter the northern door in the west wall. I can hear him pass by the door close to the desk, and when he does, I go through entering another bedroom. A golden nugget (2016) on the shelf-unit straight ahead. I leave through the left door and arrive in the gallery. Donal’s safe has to be here somewhere. However, one of those guards is on his way back, so I have to hide. I sprint around the outcropping and hide in the corner beside the door on the south side. The guard comes in and luckily does not spot me to his left (right image above). Quickly now. See those three banners on the southern wall? The middle one hides a secret safe containing my precious little object. However, slashing it down isn’t allowed, so I’ll have to grab it through the banner. I use the safe key from Reuben’s mansion. I don’t know if it’s a bug or not, but the safe can’t be relocked afterwards, it simply disappears when opened. I like to be real thorough and not leave any traces of my thieving. Therefore I’ll have to quickly lock it before it vanishes and then grab the sapphire vase (2516) before it closes completely. It’s tricky since you can’t see what you’re doing from outside the banner, but quite possible once you get the hang of it. The next red banner to the right hides another goodie, a golden goblet (2716) worth 200.
Well, that’s it! We’re done! All I have to do now is get out of this place. For those of you not interested in returning the crate used down in the den or retrieving the rope arrow above the chute in the restaurant, all you have to do is exit through the door directly to the south coming down the stairs from the second floor. One of the keys picked up either in Donal’s study or the storeroom downstairs will do just fine. I make my way through the sewers, back to the den and place the crate to its original position. Remembering along the way to close the swinging metal door in the lower sewer by frobbing the #38 lever. Oh, and not to mention closing the back door -47-, easy to forget. The safe key, Reuben’s house key and the restaurant key were also returned. I had a hard time getting on top of the railing leaving the SW part of the Overlord’s Fancy. For some reason I always made too much noise. But climbing it far to the east (just out of the guard’s sight in the SE area) made me successful. All done, what a mission! Time: 3:37:05 Loot: 2716 out of 2716 (Supreme: 2596 [TFix: 2606]) Pickpockets: 18 out of 18 Locks Picked: 13 Damage Dealt: 0 Damage Taken: 0 Consumables: 3 Water Arrows Ghost: Success! Perfect Thief: Success! Supreme Thief: Failed! Perfect Supreme Thief: Failed! Norwegian
Thief: Failed! Notes: - Got first alerts from the gamblers in the northwest area of the gambling den when going for the loot here. Had to rush in and out and this spawned comments. The coins in here can easily be skipped for Supreme though. This loot can with TFix be taken without first alerts. - A water arrow had to be used in order to reach the southwest area of the gambling. This provoked 1st alerts from the two nearby gamblers. In order to reach the sewers, these alerts are unavoidable and force busts to Supreme. -
Had to nudge the stationary
archer overlooking the grassy area west in the middle sewer to obtain the
rope arrow from the dirt below. Could douse the 5 torches instead, but found
this method to be more suitable. Engine exploitation is only allowed as a
last resort in plain ghost mode, but the rope arrow can simply be skipped for
that. - Got a mumble from the stationary lady in the northern basement if going for her purse; either that or dousing the two torches outside. I chose the first alternative. Skipped the loot for Supreme. - One first alert from Thom was unavoidable when opening the safe and taking the bracelet. Also, putting out the fire was necessary to reach the key to Reuben’s proper. Another option is to nudge Thom forward enough to reach it, but this is only a last resort alternative, so I used a water arrow instead. If urging to put the key back, it has to be dropped on the carpet in front of the bookshelf, spawning another first alert. Alternately, it can be left further back, out of Thom’s view in order to avoid the comment, should this be valued as a “safer” option. - Got two alerts from the archer guarding the door to Reuben’s lair. Only one taken with TFix; the lights are no longer as strong, it seems. Had to go back also, so there’s one more. - Three first alerts from the kitchen maid on Reuben’s first floor were produced when trying to reach the northeastern storeroom. Dousing the two torches in the hall is another option. Loot skipped for Supreme. -
Spawned a comment
from one of guards in the den when opening the gate approaching from the
south basement. - Used one water arrow to douse the torch in the hall outside Donal’s kitchen. Also got a grumble from the maid going in and out of this place. - Skipped returning Donal’s safe key to Reuben’s. If wanting to place everything back, like the Supreme rules state, two more busts from Reuben’s archer in the upper sewers are then required (only one with TFix). You can avoid the alert on the return trip, because you can just end the mission in the outer courtyard at Reuben’s. |